[] |
 (c)アリスソフト |
[edit] Navigation:
|
| General Information |
| Characters |
| Game Mechanics |
| Playable Characters |
| Skills |
| Quests Walkthrough |
| Custom Characters |
| EXP table |
| Equipment |
| Bestiary |
| Hints and Tips |
| Gal Monsters |
| Time-Limited Events |
| Rance Quest Magnum |
| Version Changes |
| Popularity Poll |
| Character Endings |
| FAQ |
This page lists the walkthrough for various quests. Maximum acceptable level is the level above which the game considers you overpowered for that quest and gives you drastically less EXP: 1/4 EXP if six levels over the difficulty, or 1/16 (1/12 in 1.15 onwards) if eleven levels over the difficulty. The Maximum acceptible level is equal to 5 levels over the difficulty level of the quest. The CP (Charisma Points) amount rewarded is cut into half and rounded DOWN every time you redo a quest, and after you clear it for 1 CP, it will subsequently give you no charisma.
If the quest is completed with Lia ParaPara Leazas in your party, you get 2x charisma from that attempt at the quest but will get no charisma in subsequent attempts. The idea is that having her lets you drain all the CP from that quest in one go without suffering any CP loss due to the round down (when cutting CP reward in half each time).
Sometimes you may fulfill requirements for new quests shown below, but don't see them in your quest menu. Re-clearing any quests that allow you to fight should update it.
If you just started playing this game, please review this page
Quest #11: Customer Survey
- Added with Rance Quest Magnum.
- To Unlock: Clear 53 (?), unconfirmed
- Type: ADV
- Rewards: None
Alice-chan gives a customer satisfaction survey about Rance Quest Magnum. She asks various questions like whether the player would buy another game with the same system, if the CG was satisfactory, and whether the player believes in a god. All results are sent to Alicesoft. Optional quest.
Quest #13: Alice's Cottage
- To Unlock: Clear #25
- Location: Alice's Cottage located somewhere
- Type: ADV
- Rewards: Skill Returner (One-time), 50,000 Gold, No CP
- Description:
NOTE!!! Skill Returner given after you do this quest once after installing the v1.100 patch. If starting a new game, do it twice.
GIves 50,000 Gold after Quest #77.
Gives 200.000 Gold after Quest #177
Quest #14 Change the world
- To unlock: Clear main story and beat Masuzoe Quest #115
- Reward: Go to the next world (restart game with higher difficulty setting)
- Description: Go to the next world.
- All levels reduced to 1/4
- All skills reset (except special skills obtained through items)
- All equips removed
- Special item is not removed and does not get absorbed
- Bonus attributes obtained through absorbing items does not reset
- Atena 2.0 attributes reset
- All quest status reset
- All obtained characters are still in the party
- All items still remains
- Frostvine shop is not reset
- Number of donated items is reset
- After you complete all the main story quests again in world 2, this quest is unlocked again, this time you can choose to go to world 3. Everything is the same as when you changed from world 1 to world 2, except it is even more difficult. There are five worlds, since quest #115 of world 5th will be Honey King instead of Masuzoe who will still appear in the dialogue.
- A word of caution. On higher difficulties, it's far more important to one-shot troublesome enemies with characters like Arms. On enemies you cannot dispatch quickly, it's absolutely vital to stun them with Rangers, Kaloria, Childie, Elenoa, etc. Otherwise, prepare for a world of hurt. Also, due to the bonus damage skills, skill with multiple hits (such as Kenshin and Rizna's unique skills) have higher value.
- NOTE: If your version of Magnum is 2.1 or higher, the only things that are reset are Athena's stats, quest status, number of donated items, and your Charisma level. Everything else is retained.
Quest #15 Return the world back to original
- To unlock: Start world 2
- Reward: Go back to world 1
- Description: All changes made when going to world are NOT rolled back
Quest #16: Scouting at The Bar
To unlock: Clear any quest after clearing #36?
Location: McCart Bar, CITY
Type: ADV
Rewards: New recruits from time to time
This is the event used to recruit new characters for the most part. Initially it gives you Prima. Then as you keep doing quests (doesn't have to be new, just repeat already done quests many time (or every 2 quests?)), it'll eventually give you Mahoko, Megadeath, Sesuna and Alexander and many more as you fulfill necessary conditions.
- You'll know you're about to get someone new from this quest if it suddenly doesn't have a clear counter even though you did #16 before to recruit someone else. At other times it will have a "cleared" counter of 1 or more and doing it won't give you anything.
Quest #17: Do Something About This Dirty Piece Of Land!
To unlock: #67
Location: Land of Frostbitten/Frostvi Shop
Type: Exploration and battle
Difficulty: 10
Rewards: 10 CP, #99, Rocky Bank (optional, see note), and you get to start building Rance Castle later on.
Some monsters are contaminating the lands by eating soil and pooping. Just kill them. Trigger 5 red exclamation mark events and win them to clear quest. By the way random encounters also exist in this map.
- NOTE! If you wanna get Rocky from Rance 6 then you have to do this map a second time. Trigger a green exclamation event at the bottom left of the map and finish the quest. At 19 lvl cap Rocky is still as lame as ever. He is needed for getting Uruza though, and a decent substitute for Sachiko in (very) early game.
- In Magnum and v1.6, he gets events later on which will let you raise his level cap.
Quest #18 : Buy Rance Palace
- To unlock: Clear #45, #17.
- Location: Rance's room, CITY
- Type: ADV
- Rewards: 10 CP (one-time).
- Description:
NOTE!!! This quest starts the construction of Rance castle.
Quest #19 : Rance Palace in Construction
- To unlock: Clear #18 and keep doing distinct quests until this one appears.
- Location: CITY, Copa Empire
- Type: ADV
- Reward: 10 CP (one-time).
- Description:
NOTE!!! Just a continuous quest of #18, this one shows Copandon pulling strings to support Rance from the shadows and guide the construction of his castle.
Quest #20 : Rance Palace Complete
- To unlock: Clear #19 & #63
- Rewards: 30 CP, #101, #102, #103, #104, base screen BGM changes, Karoria Cricket joins (Optional)
- Description:
- NOTE!!! *Repeating this quest once gives you Karoria Cricket (guard character).
- NOTE!!! *Sanakia becomes your castle guard (and comes with her own bio), but seems to have no storyline significance?
- COMMENT: The Rance Castle finally completed. Guess it took Lia to finish paying for this castle, huh?
Quest #21 : Noisy Neighbourhood
- To unlock: Clear #81
- Reward: #72
- Description: Someone seems to be building nearby?
Quest #22 : Maid at Rance Palace
- Unlock: Clear #137
- Reward: #23
- Description: Rance Castle's head maid. After clearing #137, do any quest and this will show up. It will also unlock if you visit all rooms in the castle without any characters in them as Rance runs into Biscuit every time. Once you've done that and finish any quest this one will show up.
Quest #23: Head maid's service
- Unlock: #49 and #22
- Reward: Rance castle Maid CG , #138
- Description: Special service!
Quest #24 : Head Maid's School Uniform
- Unlock: Biscuit level 35
- Reward: 5 CP, CG #154
- Required: Biscuit level 35
Scene only.
Quest #25 : Author at Kirameki Cave
To unlock: This is the initial quest when you start a new game.
Location: Flashing labyrinth near Titi Lake
Type: Exploration and battle
Condition: Sachiko must be in your party. No swapping allowed in this quest.
Difficulty: 2
Maximum acceptable level: 7
Rewards: 10 CP, #13, #36
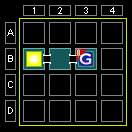
{C}The initial quest. Just keep going, trigger the green events and 1 red exclamation mark event (if this is the first time you're playing, you might want to go left and touch the spinning cylindrical thing to heal your party before attacking. Has a casket to the upper right but has a fight before reaching there. Eventually the green exclamation event right before the door to the top will end this quest.
- There are no random encounters here, the seemingly random battles are still just fixed battles getting triggered at fixed locations
Quest #26 : Find that guy and regain all manuscripts
To unlock: Do quest #36
Location: Flashing labyrinth near Titi Lake
Type: Exploration and battle
Condition: Sachiko must be in your initial party
Difficulty: 4
Maximum acceptable level: 9
Rewards: 10 CP, allows unlocking of #27 after a while
The battles here are easier than the 1st yankee quest, but the length is more and enemies attack you in large groups. Consider packing your party with Megadeath, Mahoko, Cessna and Alexander and getting your charisma to 2 before going for this one if you want to do this one comfortably. Ideal for grinding characters upto level 10. There's also KyanKyan that will level up entire party.
In first area, head right at the very first lane to enter a purple portal.
In second area, head to the top and turn right only at the uppermost lane (there's nowhere else to turn when you get there). After turning right, go to upper right at the next fork - you might already see a red exclamation mark further upwards if you're zoomed out enough. Hit it and beat the fight. Nearby there might be a green portal that lets you escape with your loot (but the quest fails). Past that is another teleporter.
Third area is actually the dungeon that you cleared in your very first quest. Only the events arrangement is different this time, and there are random encounters instead of fixed ones. Make your way to the top. The green exclamation event in the center of the space below the author's house ends the quest. At the author's house entrance itself is another event. There are 2 choices, 1st one kills the old man Do S Suki, second one not (Rance instead pours salt on the old man's sponge cake).
- Quest #27 may not unlock immediately after doing this, you have to do a lot of new quests to unlock it after this.
- Quest #28 later on requires the old man to be alive in this quest.
Quest #27 : Spring Holiday of Sachiko
- To unlock: Clear #26, and keep clearing distinct and previously uncleared quests, lots of them.
- Location: Sachiko's School
- Type: ADV
- Condition: Sachiko must be level 15 or above and be in your party.
- Rewards: 3 CP (one-time)
- Description: Just a story about Sachiko having to return to her school and then come back. All of it happens in the same ADV event, so gameplay-wise she never leaves your party.
Quest #28 : Escorting The Great Writer

- Unlock: Sachiko reaches lvl 30
- Requirements: Max 4 party members, Sachiko level 35 or more and you must not have gotten the author killed in quest #26 (2nd choice at end of quest).
- Rewards: #29, Sachiko H-scene
- NOTE: Sachiko is cursed and resets to level 1 the first time you do this. Also NO SWAPPING once quest starts, so choose your 4 members well, as the fights in this area can get tough due to certain enemies and you'll have a limited supply of moves.
- Description: Take the old man that you met at the beginning of the game to an island at the very southern region of the map (green exclamation mark event 3 areas south of your starting area). Old man must survive.
- There two more areas to the east of the 2nd and 3rd area as you go down south, but they usually don't havre anything important. Don't wander around too much unless you've got lots of moves.
- The armored cars seem to always hit your party members with bonus damage except when guarded against and are well armored, so even high level characters may have problems handling them. It's recommended to bring in an extra guard and a healer with revival along with Rance & Sachiko.
- Alternatively, like in Nopel's mission, once again having a high-HP Emmy Alphone might divert attention from everyone else, giving your other characters some breathing room.
- You might want to try taking Lia along in your first try to get all the charisma points, but it can prove to be extremely difficult especially when facing the armored cars. Her lightning attack is effective against the cars though.
- Chouchin and Zashikiwarashi appear frequently in this level. Good place to use Rance's badmouth skill when in large numbers, and excellent for capturing Chouchin if you bring someone with the rope.
Quest #29 : Invasive Parental Love
- To unlock: Clear #20, #28
- Location: Rance Castle
- Type: ADV
- Rewards: Sachiko's auto-regeneration ability upgraded to 1-star, healing her by 10% per turn.
- Condition: Sachiko must be at level 20 or more and be in your party. Also 義務教育☆☆ required to beat this quest succesfully so be sure to invest 3 skill points into it before trying this.
- Description: Sachiko's father sneaks into Rance Castle to give her daughter a visit while she's sleeping. Sachiko must have Compulsory Education upgraded to 2 stars (義務教育☆☆) or higher or else the quest will fail. Her auto heal ability will double after clearing the quest. No CP is awarded for this quest.
Quest #30 Ninja Art Impossible Treatment
- To unlock: #68
- Location: Rance's room, CITY
- Type: ADV
- Requirements: Suzume must be level 14 and be in the party (for some reason, even though this is purely an ADV event).
- Rewards: 3 CP (one time), CG.
- Description: Rance wants to ejaculate, Suzume helps him with it using her ultimate secret technique.
Quest #31 : Fugitive Ninja's Night
- To unlock: Clear both #30 and #41.
- Requirements: Suzume in Party
- Rewards: H-scene , Yuzuhara Y joints (if Kuma and Sachiko are in your party when entering the block to the right)
First go to the left and find the red ! event, beat up the monsters. Then go back to the start block and find the way to the right block, find green ! event there. When finish watching the event go back to the start block again. Go north and find another green ! chest ( get a key item " Ninja-catching Mochi" ). Return to the starting block. Go to the center of the block, you will find another green ! event, watch it and clear.
NOTE!!! Be careful of the non-(!) green event just before the last green(!) event. It sometimes sends you to a corner, thereby effectively trapping you (forcing a restart of the quest).
- Poster random battle on east side.
Quest #32 : A Kunoichi's Life Span
- To unlock: Clear #31. Suzume to be lv31 (or should it be 30? it only appeared to me when she hits 31), (unlocked for me after clearing #72? Suzume was already over 31 before.) - Yes, clearing #72 is a requirement of this - Confirmed.
- Requirements: Suzume to be lv35 and above
- Rewards: #58, H-Scene, Suzume cursed
- Description: Suzume explains to Rance she is about to die tonight, so she wants to H with him. After she dies, she comes back as a ghost. She will also be given the passive ability that ghost mobs have (1/3 damage reduction from physical, but cannot be healed by others).
NOTE!!! Though Suzume cannot be healed after this, it is still possible to regain her HP during battles etc, but this has some requirements, such as Crook or some healer's passive abilities to heal (Party protection - Heals all party members at the start of the healer's turn every turn, deactivated upon being attacked, After battle heal - Heals % of HP after battle). I am not too sure if items can be used for her recovery, someone please confirm.
Quest #33: The Kalar Incident
To unlock: Do any 2 distinct and previously uncleared dungeon crawling (ADVs don't seem to count) quests after clearing #36.
Location: CITY, Copa Empire
Type: Battle
Condition: Have only Rance in your party.
Difficulty: 5
Maximum acceptable level: 10?
Rewards: 3 SP, Crystal (optional), #66, #98
A very important quest. It's all a bunch of text about a kalar girl being captured and all and then 1 easy battle, but in the end you will be given a choice wheter to take crystal off her forehead, or not. Aegis Kalar is a very important character, so you'll need to take first choice (not to take the crystal) if you want her to be recruitable. First option is not to take the crystal second option or the bottom 1 will take her crystal. Keep in mind that you can only have Rance in your group in order to enter this quest.
- First time, you can choose 2nd option to get Crystal. Aegis Kalar will die. Quest #66 will still unlock, but there will be no way to clear it no matter what.
- Replay the quest and this time choose 1st option. Now you get to both keep the crystal and can get her later on.
Quest #34: The Girl That Lost Her Memories
- To unlock: #33 and #70 completed? Aegis must live.
- Requirements:
- Description:
- SPOILER!!! Aegis sealed her memories, and sticks with Rance when told she was his lover.
Quest #35 : Let's do Aegis
- To Unlock: Aegis level 30
- Reward: H-scene with Aegis
- Requirements: Aegis need to be Lv35
- Description:
NOTE!!! Aegis will be Lv1 after this quest.
Quest #36: Copandon CITY
- To unlock: Clear #25 once
- Type: ADV
- Location: CITY, Copa Empire
- Rewards: #26, #83, #86.
- Description:
NOTE!!! Introduction to various places in CITY, H with Atago, introduction to Suzume and Copandon, as well as old-timers Keith, Tama and Frostvine. Time to get this new adventure started for real!
Quest #37 Copandon's Escort
To unlock: Clear #45
Location: Highway near CITY
Type: Exploration and battle
Difficulty: 16
Rewards: 10 CP, and will unlock #38 later on
Same map as Highway Yankee, which you must have done a couple of times previously. Same target as that quest, except, in area 2 you must do the green exclamation mark at the tent or else you won't be able to go to area 3 (to the right).
In area 3, there's a red exclamation mark event that triggers a boss battle and after this Rance says he doesn't like doing it with women above 30. This event is optional, somehow, but for storyline coherence you might want to do it. After this, proceed to the upper right corner of the map where a green exclamation mark event will end the quest.
- Warning: Matilda will show up on the third area if her trigger is active.
- You're probably supposed to do the red event in 3rd area, but even if you don't do it you can end the quest by going directly to the final destination. That event still assumes you did the red event even if you didn't, with Copandon looking disappointed that Rance doesn't like girls older than 30. This might be a bug. This also doesn't interfere with #38 becoming available later on which recruits Copandon.
- Just clear this and 2-3 map quests after that (probably only new ones will count?) and #38 will appear. Doing the bossfight in 3rd area is not necessary and nor does it affect the eventual appearance of #38.
Quest #38 Copandon's Participation
- To unlock: Clear #37 and then complete previously uncleared 2-3 quests (has to be a quest with maps?).
- Location: McCart Bar, CITY
- Type: ADV
- Rewards: 3 CP (one-time), HCG scene, Copandon Dotto joins.
- Description: After hearing Rance doesn't like to do girls past the age of 30, Copandon wants to level up past 35 and do it with Rance one last time as her 30th birthday approaches.
Quest #39 Copandon's Birthday
- To unlock : Get Copandon Dotto up to Level 35
- Rewards : H-Scene with Copandon Dotto 10CP
- Description: Rance shows up at Copandon's 30th birthday bash.
NOTE!!! Copandon will revert back to Level 1 if you choose to do this quest.
Quest #40 Mount Hakkoda (八甲田山, Hakkōda-san)

- To unlock: Clear #45
- Location: Oda Castle, JAPAN (Actually Mount Hakkoda itself)
- Type: Exploration and battle
- Difficulty: 22
- Rewards: 20 CP, Uesugi Kenshin joins (+H scene), #41
- Magnum Guage Bonus: (5) Glowing LED Cane
WARNING: In this map if you ever take the wrong turn or walk into a false teleportal, you'll be teleported to the top-rightmost area of the map. This is a closed area with nothing to see and no teleporters leading out, not even a green one for escape, and will eventually lead to auto-failure after a few battles even if you manage to last for a while. So DO NOT EVER DEVIATE from the right path, not even for bonuses you see just to the edge of the screen.
You will meet Yamanaka Kojika in the very beginning, and be given a choice to hire her as a guide or not. Accept her help (1st choice) unless you've done this level before and have memorized which paths to take. Make your way to the second area, and Yamanaka will help guide you here. At every 4-way junction where there's a green exclamation mark event, see it and you'll see which way to go. On branching paths (at which there are new green exclamation-mark events), it's left, right, left, up. And then there is the portal to the third area. In the third block, take the portal to the far left. DO NOT take the portal to the right which is nearer to you (there will be a green event near the portal to the right and Yamanaka will warn you that this is the wrong path).
Afterwards in the 4th area, go along the way (upwards) until you find the boss which is a big pink monster. It takes a while to go down and its attacks bypass ally guard. Powerful single hitters is the way to go here. {C}Defeat it and keep going into another block, soon you'll encounter a green exclamation mark event where you will meet Kenshin. Keep going further (in the open space after, find a path to the upper left) and you'll find a cave. Touch the green event there to have H-scenes (a failed one with Torako and Katsuko, and then the one with Kenshin). Kenshin will join you once the quest ends. Yeah, sex means she's brought down to level 1.
Quest #41 Kou-Hime's Participation
To unlock: Clear #40
Location: Oda Castle, JAPAN
Type: ADV
Rewards: 3 CP (one-time), Kouhime joins, #31 (Optional), #46, #52, #63, #91
Rance meets Sill Plain after a long time, still encased in ice, and vows to free her from that state. After that, he has Kouhime "elope" (?) with him. Thankfully Kouhime isn't old enough for Rance to have sex with, so you get her at a decent level!
- Quest #31 unlocks if you also did #30.
Quest #42 : KatsuXTora Highway Marathon

To unlock: Clear #41. Kenshin has to be level 10.
Rewards: 15 CP, Katsuko and Torako join, #44, #54
Just beat them in a race which is nothing more than go along the way. Ignore all the bonus along the way. There's no way you can get any bonus in this map. Losing the race make you fail this quest anyway.
There is also a kyankyan level up rabbit girl on the third map.
Note: Katsuko and Torako are a personal favorite of mine. Reason? While Kenshin is in your party, Katsuko or Torako will get full HP recovery and attack boost at the start of battle. If Katsuko and Torako are BOTH alive at the end of battle, both of them will get 2x exp. This makes them very easy to train, and with some skills(Fighters at lv25 unlocks a skill that grants a percent chance that the move used won't be deducted by 1), they can last very long even in difficult missions. Power+Durability, what else can you ask for!?
Quest #43 : Honorable House WAR
Requirements: Both Katsuko and Torako to be at level 35 (or above)
Rewards : 3 CP (one-time), H-scene
Rance takes a "test" of Katsuko and Torako to determine who is best suited to become the next head of the Uesugi House, and gets them cursed, resetting them to level 1. Good thing they have their rivalry skill and power-up-with-Kenshin skill so they can gain back those levels relatively easily.
- Katsuko & Torako cursed with Morurun and reset to level 1.
Quest #44 : Kenshin's Dedication
Requirements: Clear #42, Kenshin at level 30 and above (I didn't clear #42 yet, and my Kenshin was only at level 22, it appeared when I do #20)
Rewards: Uesugi Kenshin cursed to level 1 again (+H)
As Rance can only H girls 35 and above, Kenshin pushes herself a little too hard. Awwww, the power of love. No matter, Kenshin is cursed to go back to level 1 once more. DAMN!!
Quest #45: A Stroll In The Park
To unlock: Clear #60
Type: ADV
Location: CITY Park, Copa Empire
Reward: 3 CP (one-time), Crook Mofus joins + Small HCG, #18, #37, #40, #61 (optional), #62 (optional), #90, #117.
No, no, she's not a trap if that's what you're thinking!
- If the barricade locking in the zombies is left intact in #60, #61 unlocks after this.
- If the barricade locking in the zombies is opened in #60, #62 unlocks after this.
- Only one of the above two will unlock the first time you do this, depending on your choice to release the barricade or not the last time you did #60. After this, redo #60 and make the other choice and the other quest will open (each time you want to try the other quest, you'll have to redo #60 and change your decision accordingly).
Quest #46 : Incident at the church
- Unlock: Clear #41
- Reward: 10 CP
- Description: Church needs help with some monsters. Two battles, one after another.
- Max acceptable lv 28. Good quest to level up to 28 if you have an AOE to clear the field, as it's very fast.
Quest #47: Explosive Research
- To unlock: Unlocked to me after i did #63
- Reward: 10 CP, #27
- Condition: As any other Escort Quest, you may have at most 4 charachters in your party
- Description: Escort Researcher Nopel to test his "dynamite". Go east one block, then stick to the south path to find a cave. Inside, go through 4 green ! star events. After the 4th, there will be a small event then keep going to find a red ! star. You'll fight 3 Bebeta and 2 bats, and yes, Nobel must also live through this fight. Bebetas in particular seem to love hitting Nobel, so be sure to get a good guard unit in your team. Also, you can't switch party members at all during this quest. All in all, really bothersome quest.
- You can use a healer like Crook with Recover Condition (状態回復) or Full Revival (完全復活) to resurrect Nobel if he dies during a battle. Healing won't help as at level 2 anything is a one shot for him, so make sure the healer has at least 3 total shots of revival. Other bring at least 2 guards with initial guard raised to 2-star, as long as you're confident they're both durable enough to last through the quest without needing to heal.
- Bebetas attack Nopel because they have a high tendency to target the character with the lowest level. Using Atena 2.0 for this quest is highly recommended, as she'll be targeted instead, or someone who has the "狙われ属性" skill which makes it likely for them to target that character instead (Emi can be good if you raised her to be a high HP tank).
Quest #48: Contaminated Humans
- Unlock: #64
- Difficulty: 32
- Reward: CG 29
- Magnum Guage bonus: (2)Sukartomekuri with growth
Description: You need to head to the block above you at the start. There, you will encounter 2 green ! marks (First one is just an event, second one is outside of a cave.) Head into the cave, and the red ! mark will be on the right (You'll have to circle around to get to it.)
- noteable loot : +40 crit / 280 atk dagger for civilian / ranger type treasure chest in cave.
- Kyankyan level up rabbit girl at C2.
Quest #49 : Changing Room Peephole
To unlock: Crook to be lv30 , completed quest 046, 047, 048 - 汚染人間
Requirements: Crook to be lv35 and above
Rewards: H-Scene, Crook cursed
The magical number... Lv35, explains, doesnt it?
Quest #50 : Young Warrior
- Note!!! This quest will take a lot of walk. First you must defeat 1 monster in the first block and you will see an event with a puzzle box, Kouhime will open it for you and there will be a hint to go EAST. So go east, and defeat another monster, a puzzle box will appear again, now it will said WEST - SOUTH. Go west one block then south one block, defeat a monster there, you will get a new hint which is WEST - SOUTH again, go there, defeat monster, the last hint will tell you to go NORTH - NORTH. Go there which is the top left block, find a red ! event, beat them up and go a bit further you will see a green ! event, and that make it clear.
- Note!!! You need not defeat any monsters, you just need to engage in a battle. Even if you escape from battle, the events with puzzle boxes still occur. It appears if monsters run away from you too.
Quest #51: Speed Wizard
Unlocking Condition: Complete Quest #75.
Requirement: Have only Rance and Childie in the party.
Rewards: 10 CP, and speed boosts to Rance/Childie.
The quest begins with a battle against three Görings, and then eleven optional battles happen. To not waste any attack actions on these 3 Gorings, use your most powerful attack that can at least do 1800 damage to finish them off in one hit.
After each optional battle, you are asked whether to continue (first option) or to stop (second option); each optional battle raises Rance and Childie's speeds once. If you choose to stop, the bonuses will remain. But continuing, and then losing, will nullify the bonuses. However, you will unlock a H scene.
Again, there are eleven optional battles. This means Rance and Childie's speeds may increase by up to 11. This speed bonus is applied only once, so do not ever pull out. If you lose, just try again until you receive the maximum bonus, or however much increase you are aiming for.
The eleven optional battles are against the following. Rance Attack is best saved for the tenth battle, and you may (temporarily at least) want Train Slash and Impulse to complete all eleven. Even with Rance/Childie at Level 50, you may barely finish; so good luck. Also, do not forget Thunder Charms on both of them.
- Five Hornets.
- Two Uppi, Samerai, and Hanny.
- Two Uppi, Samerai, and Hanny.
- Hanny, and three Horned Whale Younglings.
- Hanny, and three Horned Whale Younglings.
- Black Eye, and two Blue Hannys.
- Black Eye, and two Blue Hannys.
- Three Shouting Men, and Jar.
- Three Shouting Men, and Jar.
- Three Namari Sphere, and two Horned Whale Younglings.
- Touko-chan, and two Horned Whales.
I was able to beat the optional battle to the 11th with Rance having 16x武器攻撃1, 1x全力斬り, 3x列車斬り, 2xランスアタック and ATK power of 1935. Childie having 8x武器攻撃1, 1x武器攻撃3, 1x全力斬り, 3x列車斬り and ATK power of 1590. Of course, both have Damage Limit skill max ranked. Rance at Lv52 and Childie at Lv44
Quest #52 : A Wanted Beauty
To unlock: Clear Quest #41 (Unconfirmed: Also clear #63? ) ( Confirmed : #63 isn't required )
Requirements: N/A
Rewards: 3 CP
Rance and co. get info about the beauty, Clane, who is wanted in numerous states. Obviously she is high leveled and is in Rance's target of people to have sex with.
Quest #53 : Crane Repays Favor
To unlock: Clear #52, then go doing quests. Whenever changing location (or perhaps when the quest starts, not sure), you will randomly see an event where Crane/Klein has her foot stuck in a trap. Rance will (accidentally) free her, thus "indebting" her to Rance. Finish the quest and this will become available. Rewards: 3 CP (one-time), H-scene
She visits Rance to "repay" the favor. Aaaand we find out that the most wanted racketeer in human realm is no more than level 15, so, as an alternative reward...
Quest #54 : Crane's hiding place

- To unlock: Complete quest #53, then just keep clearing a bunch of quests (repeating already cleared ones is fine). Eventually this one will appear (perhaps after about 5 more).
- Rewards: Clane join, 20 CP
- Description: You have to find Clane, that's all. She will automatically appear after a certain number of battles (the progress bar will rise after each battle).
- There is a safe treasure chest containing Quick Strange Bug in B3, guarded by a Yudain.
- (Original Rance Quest) A lucky bunny can be found at C4.
Quest #55 : Collection of returning favor
To unlock: Clane to reach level 30
Requirements: Clane to be level 35 and above
Rewards: Clane H scene and gets cursed
The usual drill... Grind all over again?
Quest #56 : Satorare Ninja

To unlock: Lia and Childie are recruited
Rewards: Kanami will be cursed, whatever she think everyone will be able to hear it. (What a poor girl)
This quest does NOT use your current party members. This quest will have Lia, Maris, Kanami, Rick and Childie. The EXP gained here will carry over, so farming Lia, Kanami and Childie here is ideal because Rick and Maris give great support, as they are already leveled up. Note that Kanami's level will reset if she hasn't joined permanently yet.
Just go up and up farming monster until you see a green ! event and the quest will be end. And Kanami will get cursed by Pastel when she use herself to defend it from Lia-sama~. Poor Kanami.
Quest #57: Kanami's Determination

To unlock: #56 & #71 completed
Requirements: Rance must go solo, however Kanami will join you in this map, though still unable to level.
warning:Kanami must not die
This quest is about her curse, and Rance gets to hear her thoughts. Go North, North (to the top square) find the green star in the middle of the square.
Quest #58 : The reason why Suzume cannot attain nirvana
- To unlock: Suzume Morurun 1 time
- Requirements: Suzume lv 10+
- Rewards: Kanami joins with the ability "Possessed by Suzume", which allows her to gain 25% of Suzume's power. [Only takes effect if Suzume is NOT in the party.]
- Description: SPOILER Alert!!
Quest #59 : Let's Eat a Ninja
- To unlock: Kanami reaches lv 35
- Rewards:
- Description: H with kanami, she will back to lv1
Quest #60: Lion Mind

To unlock: Clear #68.
Type: Exploration and battle
Location: Ruined Shopping Centre, Helman
Difficulty: 15
Rewards: 20 CP, Alkanese Raizu join (+H), #45, #70, #100
In the first part you have to go to the 3rd block (down and right). Near the teleporter at the end of 1st area, you can ignore the barricaded zombies or let them loose, this will decide which sidequest will unlock later on. The first time you encounter Alkanese, choose not to fight (1st option). Though it is possible to win the fight at high levels, its not recommended in your first attempt, the fight's gonna be insanely hard and if you win the quest end right there.
If you choose 1st option then there will be a scene, you will be put at the starting point with all skills recovered (but substitution counter not refilled, so if it's at zero you can't swap anymore),. This time there will be no random encounters (only red mines), just go to the same room as before and fight Alkanese (alone) with half her HP. She's still difficult though, and has a physical AoE attack, so it'll help to save a Rance Attack and/or a fighter's Full Power Attack to take her out ASAP.
- If you leave the zombie barricade alone, do #45 and #61 will unlock
- If you release the barricade, #62 will unlock after doing #45
- Of course, you can replay this quest and change your decision and enjoy playing both quests at different times, but when one becomes doable, the other will get locked until you do this quest and change your decision again.
Quest #61: Cheetah Mind
To unlock: Clear #60 and #45, and must not have broken the zombie barricade in your last attempt at #60 (in 1.6/Magnum, don't break the barrier in any one attempt; last attempt doesn't matter).
Type: Exploration and battle
Condition: The zombies must not be freed in your last #60 mission, Alkanese Raizu must be in your party.
Location: Ruined Shopping Centre, Helman
Difficulty: 20
Rewards: 10 CP, Gyokuro Axe (Optional)
Same map and starting point as Lion Mind. Except the boss is not at where Alkanese was. Remember the location where you had a bossfight against a fat Lion Mind thug in white jacket (a red exclamation mark event) in #60 before proceeding to meet Alkanese the first time? Right below that point, go right instead of going up, then lower right in the open space. There's another teleporter (this exists in #60 too, but perhaps you won't have the time to explore it without high charisma). Go through here and navigate to the center of this map (not too difficult, almost all paths lead there eventually anyway). The red exclamation mark event there will be the final battle. You'll fight Silbarrel, the ugliest woman on earth. The boss battle consists of her and 2 Pig Banbara. Her attacks don't do much, but her defences are kinda high, especially magical defence... Take her with hard-hitting single attacks instead of AoE attacks and don't run out of moves. Crook's Shoulder Throw should hit her pretty hard. Anyway, Crook will literally "dispose" of her after the battle, and Cheetah Mind will disband.
- As Alkanese will tell you, going to the location where you met Alkanese in #60 (upper right of 3rd area) you'll find a chest which will give you her old weapon, the Gyokuro axe. It hits crazy hard for your level at that time with less accuracy, and zero critical/stun rate unless you have another piece of equipment giving you that. It's for fighters only and requires level 15 to equip.
- You only get it the first time you go there and open the chest. It will not appear subsequently.
- A green exclamation mark event in one of the toilets in the 1st area will get you into a fight with 2 doppelganger (imposter?) Alkanese. Don't worry, they're not as strong as the real one in #60, but still can stun you with AoE attacks, so be careful.
- In the last block with the Cheetah boss, keep opening chest until Tomato pop up. After that she will join (Need to check up on this, but i catch her 2 times here) (Caught her in the block before)
Quest #62: Zombie Room
To Unlock: Clear #60 and #45, and opened the barricade in the first block of #60
Type: Exploration and battle
Condition: Crook must be in your party. Also in your last quest for #60, the barricade must be broken to let the zombies out (in 1.6/Magnum, just do it once at some point, result of last try doesn't matter).
Location: Ruined Shopping Centre, Helman
Difficulty: 18
Reward: 10 CP, Zombie Sword (Optional, Indefinite)
NOTE: Cannot swap your characters once quest starts. You have to finish this with only the five you start with, so choose wisely.
This map is the same as Lion Mind (#60). You start at the bottom right area. The exit from this area is to the left of the room, which will take you to the area where the bossfights of Lion Mind took place. From here, your target is to make it to the entrance hall (if you beat Lion Mind, you just need to go backwards), beat the zombie boss there, and then get out throught the door. If you don't have a lot of moves, it's better you don't fool around for too much, especially since you need to save a few powerful moves for the boss.
However, if you go into the room where you broke the barrier restraining the zombies in Lion Mind, there's a green exclamation mark event, choosing to destroy the jar will stop all random encounters (and red mines will be turned into mostly easy hanny battles). After this, going back to the room where you met Alkanese in Lion Mind will give you a Zombie Sword (CC rank) which deals extra damage to, well, zombies. This can be obtained indefinitely each time you try this quest. Whether you destroy the bottle or not also decides the ending of this quest.
- Since this map have only zombies, which only take 1/3 of phys attack but do low damage, its a good place to grind your unique growth equipment early on. Simply pick any person who have the most number of available skills (for weapon) and equip it with the unique weapon, and let him/her grind alone, while others just being a meat shield without any skill to use, except healer of course. When done, swap him/her with the back line, preferred damage dealer for boss.
- Or you can do the above with 5 characters grinding each unique weapon, just grind with cheap skills, keep the best one for the boss. You may expand this trick to be able to grind your characters here effectively, with less exp of course.
- If your levels aren't very high though, just bring units best suited for dealing with zombies for the first few times: healers, especially those with Cleansing skill can one-shot undead, plus sorcerers with light attacks are also good. Aside from that, any light-element weapon or one that deals bonus damage to zombies is good.
- Since no swapping is allowed and this quest needs to be done at least once before you get Lia, in order to get maximum charisma out of this one, do this exactly once before getting her (quest #63). After getting Lia, the next time you do this, make sure you bring her along. After that, go after the Zombie Sword.
Quest #63 : Leazus's Ghost Story
To unlock: #41
Type: Exploration and battle
Location: Leazas Castle, Leazas
Difficulty: 25
Rewards: 20 CP, Lia P. Leazas joins, Noir joins (optional), #20, #50, #52, #88, #92, Iron Armor (Optional, Indefinite)
Almost all monsters in this quest are undead which take only 1/3 damage from physical attacks. Therefore, using magic is a better idea. In addition, level 10 Healers can learn Exorcism which deals heavy damage to ghosts. Their high accuracy maces (hammers only healers can use) also damages ghosts normally with physical attacks, making Crook one of the best characters to bring on this quest (there aren't many healers other than Cell before then unless you create Custom Characters). Perhaps also Frostvine if you badly need more uses of exorcism, and mages with light attacks.
Just go all the way to the right and then go down then left, along the way you will see a maid ghost, and at last in a red exclamation mark event, you will have 2 choices, If you choose the 1st you won't have a fight here but you won't get anything either. Take the 2nd choice and you'll have a boss fight against 3 Temple Knights and a HCG afterwards. But honestly if you're running out of resources or have an avg level under 20, perhaps you shouldn't push it... The knights hit pretty hard plus have a skill that heals all of them by 200 HP, and they regen 150 HP per turn when damaged. The knights are weak against darkness, so if you have any dark element sorcerer, let her go at 'em.
After getting past that, just keep going forward and eventually the next green exclamation event will end the quest, have 3P with Lia and Maris and have Lia join you.
- You should do this quest ASAP to get Lia. She has a skill which gives you 2x charisma from every quest if you have her in your party (but no more charisma from that quest afterwards - you're given all of it in one go)!
- In 1.6/Magnum: You need to beat the knights and save the ghost maid once in order to unlock quest #202 later on.
- Recruiting Noir: Activate a green star that is behind a red mine at a room entrance. The green star appears randomly. Redo the map if you don't see it. The red mine has Yudain waiting for you, who has very high dodge rate and magic resistance. Unlike other red mines, this one won't disappear unless you finish him off in the time limit and you'll be forced to step back (which will very likely happen if your levels are barely par for this quest; see below for tips).
- Tips for Yudain: You can use Yuzuhara with Shot 2 gunner's skill, Kenshin with her Cartwheen Sword skill (the 8 SP one) and finally archer classes usualy have 100% accuracy skill (4 skills to learn). Magic will always hit him but won't do much damage. Physical attacks will do more damage but almost always misses (which is why physical attacks from gunners with 100% accuracy is the way to go). Or just Assassinate it.
- There may be good items in a room (after Noir's room) guarded by another Yudain monster in the final area (Usually Forbidden Talent - Weak is found).
- The goodies (Noir event and chest) in the above two rooms guarded by Yudain may or may not be spawned on every attempt at this quest. Repeatedly try the quest until you obtain both.
- The Ghosts can use an energy drain skill on your characters (ally guard bypassed) that will cause that character to gain no exp from that battle (just like Berserker, except you get no bonuses at all).
- There's an Iron Armor in a green exclamation mark event to the right of Noir's room where the gate is guarded by Yudain (red mine) and can be taken everytime you do this quest, giving you an unlimited supply of these. This likely requires Rance in your party to steal succesfully.
- The green event in a bedroom next to the healing orb may randomly trigger a fight against an undead troop so be careful.
Quest #64 : Go see sick Magic
To unlock: Get Lia, and clear Quest #71
Rewards: Magic join / #48 #65 #139 #140 #141
This quest is quite difficult. Go along the way pass through 2-3 blocks and you will have to fight Matilda with Chaos aura. When beat her, go ahead, then you will have to fight a boss which is a poison dragon.
Against Matilda, though I am not exactly sure of the rates, but I always use assassination on her, and it usually works. Killing her in a single hit really eases out on the battle/entire quest. Especially since she can counterattack your fighters.(Rance vulgar speech attack works as well.)
The poison dragon (GR Dragon) has an all attack which cause your party to be poisoned and, even worse, stunned. It has low attack but high defense, so this will be quite a long fight, use character with a lot of move and attack, and one healer that can heal everyone is recommended; don't bother curing the poison since you'll just get poisoned again. Note it's weak against Light.
Note you can enable a shortcut for your second visits; this will however require a failure of a mission. First, get to the map of the red star, then when spiralling down, head South to see a green star, it may lead to you being swept away or something, thus you fail the quest instantly(Not sure if checking of the 2 green stars at the shop at 2nd map is required). Then, repeat the process, however, the green star is now replaced with a purple gateway. Once activated, a shortcut is available for you to save a lot of time and effort (Matilda is on the normal route, this can bypass her as well). Confirmed once you get to the boss hit the green star event to fail the quest but open up a door in square 3 to the north to go straight to the boss.

yellow:start point
red: finish point, if you not check a green star south of 2nd map an shortcut will appear in south of this map else a green star appear and you will fail this quest if you check
Can someone confirm this as well? I repeated this quest several times, heading to the shop in the second map, if you head south from the shop you get to a green star. You may fail the quest here, but Rocky may get a free 5 level boost in his cap (from 19 to 24). I am not sure if this is a specific event or the exact requirements for this.
Quest #65: Curse Eraser at the Museum
To unlock: Clear Quest #70, #64
- Magic must be part of your party
Rewards: Quest #72
The dungeon is cross-shaped: You start in the middle. Find the red event in one of those blocks.
Quest #66 Love Letter to the Kalar
To unlock: Clear #33
Location: Kalar Forest
Type: Exploration and battle
Condition: Rance and Suzume must be in your initial party. If Aegis Kalar was killed in your last attempt at #33, this quest is impossible to complete, you can only grind EXP and money and get treasures if you use the green portal to escape. In that case, redo quest #33 and choose the 1st option after the battle.
Difficulty: 11
Maximum acceptable level: 16
Rewards: 20 CP, #67, #69
NOTE: DO NOT take any purple portal in this level except when you're told to, or else you'll always get sent back to the starting point.
First go straight, fight the first kalar girl (conversation triggers at first random encounter), then seek the exit that leads north. For this, go straight up, then turn right, then go upper right at the fork (lower right is a dead end), take the U-turn to the left (ignoring the misleading purple portal to the right), now go upwards in the open space. There should be a heal-all pick up here, next to it is a purple portal. This is the portal you have to take to go to the 2nd area without getting lost.
Then, in second location, go straight upwards, then, in an open place where road goes 4-way, there will be a green exclamation event at the center. Go left and upwards. At the Kalar Village gates, there are 2 adjacent green events. Touch either. Now if you got Aegis killed, here you'll just have a battle (pretty tough, for the expected levels of this quest) and regardless of the results, the quest will then fail. If not, only then you're given two choices: choose the top choice to retreat (choosing the 2nd option will get you in a boss fight against Aegis - she's terrifyingly strong for you unless you're way overpowered for that quest). Now, come back (go right) to the 4-way junction. Take the right path this time, and into the first green star event (involving a statue), then go left, to the green exclamation event at the center of the 4-way junction. Kill the Amazusa enemies. You'll obtain a naked kalar girl as hostage, "Rurikka". Then go back to Kalar village gates, watch the H-scene and go back to the right green star event with the statue. You will be teleported to a new location, that is a straight path. Follow it, and you're done. There might be a trap in the way that's unavoidable, but if you have Suzume in your party and didn't get hit by a trap previously, you should be okay. Or even then the damage it does is unlikely to kill you. The green exclamation event at the end of this path ends the quest.
- Attempt this quest at least once to unlock #69, whether this quest fails or succeeds, it will be unlocked.
Quest #67: Infiltrating The Kalar Village
- To unlock: Clear #66.
Location: Kalar Forest
- Type: Battle
- Condition: Max 4 characters in the party. Suzume and Sachiko Centers must be in party.
- Difficulty: 12
- Reward: 10 SP, #17, #68, #121, H-scene.
One battle, and in the end get cursed by Pastel Kalar.
Quest #68: Pursuit For Sex
To unlock: Clear #67.
Location: City, Copa Empire
Type: ADV
Reward: 3 SP (one time), HCGs, #30, #60, #89, #96
Event where Rance has a wet dream, then nearly commits suicide out of frustration but Kanami stops him just in time. Merely continues the storyline and unlocks extra quests.
- The HCGs in this event are reused from Rance 02 (remake) and Sengoku Rance.
Quest #69 Amazusa's Training Grounds
To unlock: Attempt #66 once (fail or succeed, it doesn't matter).
Location: Forest of Beetles
Type: Exploration & Battle
Difficulty: 9
Maximum acceptable level: 14
Rewards: 10 SP, 耳狩りブーメラン/ Ear Hunting Boomerang (Indefinite)
Apparently has no storyline impact and is mostly for grinding. You just go upwards, then go upper left instead of right (going that way might still have stuff like random chests, exp bonus pickup, gold pickup and red mines though... other than that it's a dead end). You'll find a green exclamation event, it looks optional. Anyway, just head further up, when you come to a large open space head all the way to the right. There will be a single treasure chest containing the boomerang. Taking it ends the quest, and repeating this each time seems to give you that boomerang endlessly. It's for rangers only and does bonus damage to Kalar.
Quest #70: Kalar Forest Once Again
To unlock: Clear #60.
Type: Exploration and battle
Condition: Suzume must be in your initial party.
Location: Kalar Forest
Difficulty: 14
Rewards: 10 CP, Aegis Kalar joins, #34
Map is same as quest #66. Also, same navigation rules apply: if you take the wrong portal, you get sent back to starting point.
This time you cannot use the same enter as #66, and there will be no green exclamation mark. First you have to go to the Kalar Village gate (The one with 2 green ! events... you should remember it from #66). Watch an event then head back to the 4-way crossroad and see an event that you capture the same Kalar girl (Rurikka) as #66. Then go back to the gate. You will lure Aegis out and this time she'll will erase her own memory of last 5 years in order to not tell Rance about the entrance of the village. However, Rance takes advantage of the memory loss and will tell her that she is his lover and that Pastel cursed both Aegis and Rance (to explain the memory loss of Aegis) and she will actually believe... After that, go back to the entrance. The kalars will scatter and retreat seeing Aegis turned against them, and you can enter the village. Take the next teleporter, go to the next area, and go towards the open space in lower left where you'll find a red exclamation mark event. That battle will end the quest, and Aegis will join.
- Warning: You might run into Matilda here. When you enter the purple portal behind the wooden walls she might be on the other side waiting for you. Depending on your level and the condition of your party at that time this can easily get you wiped (or at least several of them).
- Warning: To the right of the 4-way junction, past where the statue in #66 was, there will be a green exclamation mark event guarding a passage leading upwards. It gets you into a somewhat tough bossfight (if your magic resistance is not good) consisting of Happi and Akame (particularly the Akame which hit for heavy fire damage) and has no time limit. Not sure if it's required for something, but be prepared before going into it - because it's a green event it might fool some people who might think it's a storyline event and once it starts it's a deadlock - kill or be killed. The portal past this fight doesn't seem to get you anywhere special - you're sent back to starting point as usual.
- The narrow linear path that you could get into by touching the secret entrance statue in #66 will still be here but not accessible as the statue can no longer be used. Not even if fights and pickups spawn on that path -you'll miss 'em.
Quest #71 : Kaito the Demon
To unlock: Clear #90
Rewards: Mouri Teru join (If you see her event, look at the note) / #64 / #81, 30 CP (First time)
Requirements: Rance in your Party
A milk cow is around. Mainly just a girl with big breasts, and hearing this, Rance will do what he always does.
Upon starting this quest, in the first map, there is no enemies, and you can head back into the house, but if you choose to eat in there, you fail the quest as you kept eating. If you choose not to eat, all your characters will leave with half their Max HP (regardless of how little or how much they had before).
Head south one block. In here and the easter block, you should capture 5 cows (green ! stars). After that, you'll find another one with a black cow that will run away (I'm pretty sure this one is always in the block south of the house). Remember where this one is.
From the block south of the house, head West one block to a couple of barricades and head all the way west until you see a green star event. After the long event, you will return to the house at the beginning, and all your characters will have 1 HP, so use the event there and pick the 2nd option (to not eat) so you at least end up with half HP.
- For Mouri Teru: At this point, head back to the barricades. At the end of the path, there are two green star events, view them and in one you'll meet Teru. By doing this, if you finish the quest, she will join you.
Head back to where you saw the black animal for a fight. You'll fight 2 Majisco in the back, and 3 Box guards-whatever-they-are in the front. Beating them clears the quest.
Quest #72 : The main cause is Pastel
To unlock: Complete Quest #65, Quest #81, and Quest #21.
Rewards: #73
Requirements: Aegis and Clane must be in your party
This is a very tough mission, especially if you are not that high level/strong. So better train hard and prepare a good team, and make sure you can change your members at least 4~9 times! Or better yet, keep 2 very good teams to bring along!
First, make your team that includes Aegis, Clane, and 3 members of a very powerful team, best to have a healer included to start the mission off.
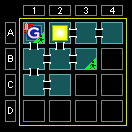
Go to the 4-way junction, and head East. No, you do not head to the old village. The old village is gone, though there are 4 chests for you to collect random consumables of rank C, B, and A (rank A requires rare treasure finding skill) there that seems to come out endlessly each time you do this mission. There is also a safe exit in the previous map, so you can spam this tactic to collect items to donate, or pick up a rank A consumable every now and then. -confirmed by MGA2
Upon heading East, you see a Red Star. This is a boss similar to the machine you fight #65. It has very high HP, moderate attack. However, it has 2 attacks, one where it swings around and hits your entire front row, the other making it jump up and slam downwards to deal damage to ALL your characters. Watch your HP over the fight. Stunning don't seem to work on this(stun work, but you need a character with high odds of stun like crane), and his speed is rather fast, so try to kill ASAP. (Stunning worked for me, but maybe I was just REALLY lucky)(Stun worked for Crane with 130% stun using shurikens almost all of the time)
After beating this boss, you would be horrified to know the worst is not over. You must now enter the entrance behind him by having a single female party member full female party, or else you will be bounced back to the starting point. After you pass through, you can put more people into your party, and you will have to continue exploring(Eastward all th way, then northward all the way), until you eventually find a red star event, with 3 mobs, and a green star event behind that at the top left hand corner of that map. Only then will you clear this mission. Its long and tedious, and any mistakes may cause you to have to go through it again, so be careful!

yellow: start point
red: target
Quest #73 : The child who wait for Rance

To unlock : Clear #72
Rewards: H-scene, cute scene, and Risette(Rance's daughter) appears! Oh, and #74 unlocks too.
Requirements: Rance to go solo
In this quest, you first seek out a place where there is meant to be a high level (monster)female. after going east and then north, you reach an area without random encounters, and a lot of green events that will give you a choice (1st one is to fight and capture them, 2nd is to not fight). After that, go up to a room with a big green ! star event where he will meet Raruga (the succubus from Rance II). Raruga tries to seduce him but fails because she's under level 35 (and leaves crying due to her pride as a succubus). Rance can then leave to the right, and continues in the forest, until a green star event, where Risette appears to challenge Rance, then puts him to sleep. Seeing him sleep so happily, she then decides to sleep beside Rance, and Rance picks her up later. He intended to raise her into the perfect bride for him. Unfortunately (or fortunately), that plan went down the bridge when he found out she's his daughter (hilarity and cuteness ensues).
Pastel's only attack is black destruction ray besides charge and cure, put a darkness amulet on rance and it is easy as pie
Quest #74 : We are really father and child???!!!
- To unlock: Clear #73
- Requirements: Rance
- Rewards: Cute CG scene, #75
- Description: Only Battle.
NOTE!!! This is a simple event where Rance's daughter goes around Rance's Castle, and her mommy comes to bring her home. Simply fight and beat poor mommy(She's strong, as she would put ATK and DEF down on your entire party, with poison, right at the beginning, my Rance wasn't affected, but all other 4 members were. She then charged up for an attack, but got stunned and owned. As said, she can be stunned. Try working on that, easy fight if you manage to stun her continuously), and she starts crying, so the cute loli starts comforting her mommy~ OMEGA KAWAII
Quest #75 : Ex-Empresses' graves
Unlock: Quest #74
Rewards: Quest #76 (unlocked #76,#51 as well as #95, confirmed)

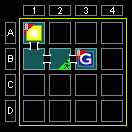
This is a large map that i lost several time, in most square on top (second square too, but i don't go that way, so ...) have a event in south of map to open a way to next square below but only one is right way
yellow: start point
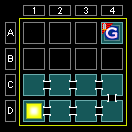
Block A3: Head to the southern path of the block to reach a green event. Choose the first choice to be taken to B3.
Block C3: Head down aiming towards the left side of the block to see a green ! event at a gate. Crook will leave you at this point.
Block D4: Keep heading past the green events until you see the red one, where you will be attacked by 6 golem monsters in waves of 2 each. Kill them ASAP as they do heavy damange to your party! (It's the same golem that can instant kill your party that's less or equal to lvl 35) Afterwards, keep heading towards the path of green events. You will eventually come across a crystal cave area with a big green ! event with 3 statues behind it.
Quest #76 : Helman 3rd army
- Unlock: Quest #75
- Difficulty: 42
- Rewards: CG #55, 57, Quest #77, Quest #127(It didn't appear until I did this quest)
- Magnum Guage Bonus: Rabbit Pot
- Description: Defeat the Helman troops and go north. At the first door you will get two choices, you can choose to take the Amitos route or the Olge route (one CG each). The first choice is Olge, the second choice is Amitos.
- Amitos Route : At all green star events, you will see Kalar girls being captured, you can fight and help them out. At the green! event you will have two choice, to fight(second choice) or to run away(first choice) and redo the screen, if you run away 2 times, Amitos will weakened. (But I think you can fight, it's not that difficult). And when you win, you will get Amitos CG.(You can assassinate her for a easy win)
- Olge Route : At all green stars event, you will see Kalar girls being raped, you can fight and help them out. At the end red ! event you will have to fight Olge (which I think easier than Amitos). And you will get the CG of Olge and his subordinate raping Kalar girls.
- Afterwards in the main camp, first fight the general in at the tent before moving towards the gates to the north. If you don't defeat the general first and go straight for the gates, it's game over.
- You'll then get another sequence (Rance becomes a cool badass), a fight, then clear.
Quest #77 : Final Quest of true route: Empress Pastel Kalar
- To Unlock: Clear Quest #76
- Rewards: H-scene with the three fomer Kalar queens (in Pastel's body). Magnum gauge sometime gives a unique A rank item.
- Description: A 30-floor tower with around 6 boss fights. At least 3 boss fights are mandatory even if you replay the quest.
- It should be HEAVILY noted that this is the FINAL quest of the game. Clearing this quest will essentially beat the main game (excluding Rance Quest Magnum route).
For this quest you get unlimited character swaps, and Rance's actions are restored after battling a queen. So go all out with him; don't conserve his Rance Attack and whatever skills he has. Also, this essentially means Rance's Escape may be used six times.
Each floor with a 2nd digit of 1 (1,11, 21) has a green star event on the right side that will warp you to the highest floor you've been when you enter the next floor, but only up to 10 floors each time. You may also find these green stars on random floors (but you probably want to use the non-random ones as it's easier anyway)
e.g You climbed up to 16 floors. The green star warp on floor 1 will warp you to floor 10, but the 2nd warp on floor 11 will only take you to 16.
Every floor with a 2nd digit of 9 (9,19,29) is a special floor with no monsters, a healing orb to recover your current party hp to full, and a guranteed escape door.
Every 5 floors is a mid-boss while 10 floors is a boss. Mid-bosses can be skipped through warps but apparently only if you warped 10 floors at once. If you warped e.g 7 floors you still have to fight the mid bosses and the floor you warp into will transform in to Mid-boss floor.
For climbing the tower, Rangers are very important as even with unlimited character swaps you will just run out of strong characters eventually. A Ranger with Escape and the escape related yellow skills (or better yet, multiple Rangers) can basically blaze through the tower. Meg's Relax is viable too; try to raise her speed though. She can escape from the Stone Guardians while Rangers and Rance can't.
Mid-bosses:
- Floor 5: Matilda - Can be assassinated for a very easy win. Otherwise make sure your front characters can take a beating and is resistant to stuns.
- Floor 15: Crystal Robot - Either attacks the whole front row or everyone with chance to stun, so guards are useless. Simply get your heavy hitters to wail on it.
- Floor 25: Monstergirls - Not much difference from running into a standard fight with a lot of monstergirls, although these comprises of very tough ones. Rance unique skills and anyone who can AOE work well here.
Bosses:
- Floor 10: Modern Kalar + 2 Root Wall: Nothing really special, it's basically an old Kalar fight with upgraded stats. The walls are weak to fire and will guard her, but don't do anything themselves. Modern has dark/light element arrows that deal quite a bit but a Healer and a Guard will generally take care of that (especially if you resist one of those elements). She's weak to Ice but that's hard to take advantage of as she seems to have a high magic defense. Generally only Spartas and Aegis will do it unless you're lucky enough to find a random Ice Element weapon.
- Floor 20: Vivid Kalar + 4 Crystals (Fighter, Guard, Healer, Sorcerer): Vivid is invincible until the crystals are destroyed so don't waste your time attacking her before. She only has one attack, an insta-kill curse that kills anyone but needs to charge EXCEPT Rance, who is immune. A strategy is to have two characters possessing multi-target attacks. So pick two among Gunners, Sorcerers (preferably with dark magic), Hammer Fighters, and Rance; they should be enough to take out the crystals. Also, bring a healer who can revive allies; if you kill her fast enough, one action of revive is enough. Once all the Crystals are dead, Rance can defeat Vivid alone even with the weakest attacks as she is completely unable to do anything to him. However, if you can, do keep your other characters alive because Vivid has a strangely inflated EXP value (20000 exp, even more than the last boss)
- Floor 30: Full Kalar: This one needs some work. Full Kalar opens up the battle with a curse that poisons and attack/defense debuffs all your characters (except Rance, who is again immune) and then cast Lightning spells most of the time, sometimes changing to Flame spells. However, the spells are fairly weak. What is scary is the fact she will regenerate 800 hp per each of her turn, while having a high enough defense that dealing more than 500 damage to her is not simple. This battle recommends some setup characters
- Someone who can poison. Not counting special abilities, only Rangers can do this. Kouhime can do it with her unique weapon, but she's VERY slow if she's wearing her unique armor and you might need her for other things (see 2). Poison will deal 500 damage per turn and help counter her regeneration, as trying to outdamage 800 hp per round is NOT an easy task. Note she will randomly cure the poison you have inflicted though.
- A "tactician" character like Urza or Kouhime. The buff move will cancel out both poison and attack/defense debuffs after the curse, which is good because they really cripple your characters. Healers are sufficient too.
- A guard (or Emmy) with preferably, but not necessarily, high resistance for Lightning and Fire. She only has attacks of those two elements so a guard who can resist both is basically invincible. Resistances aren't required if you plan to use a healer.
- A Sparta with the debuff punch or the 3x to human attack. The debuff punch is useful for giving her defense down and then the 2nd attack is generally the best way to deal damage to her I've seen. I used Kibako here but you don't really need any uniques for this. Crook's a good choice for using Shoulder Throw too.
- Other than that, it's basically a level and weapon check. If you are too low level and your weapons suck you won't be able to kill her before your moves run out. She will stop healing after a while, so you can stall with weak attacks before finishing with your best moves. Try to have fast characters too in order to pass turns faster.
- These three bosses are easy when compared with the dungeon itself which is FAR as hell!! Just focus on saving your action of your 5 characters for the boss; this is the most important. Good luck!!
Quest #78 : Drunkard at the bar
To unlock: Beat Matilda and Bard for the 2nd time in total in dungeon encounters.
Location: McCart Bar, CITY
Type: ADV
Rewards: 3 CP (1-time only).
Bard gets drunk after losing to Rance a second time and seeing Matilda's virginity being lost to a piece of yam, rambles about his frustration at how Rance keeps stealing his girls. In his drunken state, he's unaware that he's talking to Rance himself.
You can beat them in the following locations upon switching locations twice.:
- In the Highway Yankee quest (#86) after being cursed (#67).
- Malgreed Labyrinth Floor 1 (#121).
- Kalar Forest revisited (Quest #70), when taking the portal past Kalar Village gates and entering the final area.
- Unconfirmed: These fights will only trigger if your level is high enough or if you've progressed a certain amount in the storyline?
Quest #79: Boobs Are In!
- Unlock: Failing Mission #71 by choosing 1st option in the green event at 1st block, then do any map quest EXCEPT #71 itself.
- Rewards: Meg Joins
- Description: This event assumes quest #71 failed, and thus all of Meg's cows got killed by monsters, so she now comes to CITY looking for a new job. Rance takes her in, in spite of Crook advising against it.
- Note: After failing #71 once, if you immediately redo #71 itself and succeed, this will not show up. You'll have to fail it again and do some other quest with maps.
Quest #80 : Houseki oneesan
- Unlock: have Klein in the party to get a random map event of hearing about a super level god
- Required: 1x Houseki(Gem/Jewel)
- Rewards: 10 CP
- Description: Straightforward dungeon. Head west, then south, then east, and finally north. Touch the event, then choose the second event to talk to her to give her the houseki. If you choose the first event, the quest will finish but you won't get anything, but you won't lose the houseki either.
- This quest can be repeated so long as you find more Houseki(Gem/Jewel)
- NOTE: With Crook in your party the Houseki Onee-san runs away even if you choose option two...(chek please, but for me it happened 3 times)
Quest #81 : Miracle of Artificial Intelligent
To unlock: #71
Reward: H-scene of Athena 2 (#65), Athena Join
Simple quest, just some text, get H-CG, then she will join.
Quest #82: Tama's in Heat
To unlock: Buy Tama's Underwear (タマの下着) at the shop.
Type: ADV
Condition: Buy Tama's Dress (タマの洋服) as well. You can't initiate the quest until you do.
Location: CITY, Copa Empire
Rewards: 10 CP, CG with Tama, Mercenary Tama & Mercenary Old Hag become available at shop (1k gold each).
Quest #83: Hunting And Eating Grapes
To unlock: Do #36 once.
Type: Exploration and battle
Location: Cricko Grape Field, Leazas
Difficulty: 3
Maximum Acceptable Level: 8
Rewards: 10 CP, and some "service"
Your main objective is to keep killing the "grapes" by touching the red exclamation marks, and harvest the fruit until the quest bar fills up fully. If you don't kill them you won't get any grapes and have to fight that battle again, making your moves go to waste, so concentrate on killing them in time. In the initial location you'll probably find at 2 of them, but a there's a purple teleporter to south. Getting there you'll immediately get into a bossfight (sort of) against 2 fighters and an archer with no time limit. In the next location there will be plenty of them, as well as some (usually 3) shining gemstones which will give you +3% exp bonus each for this quest, so grab them first and receive +9% XP bonus for all remaining battles! Note that one of the red exclamation marks in the 2nd area (around lower left corner of the entire area) will have 3 grapes instead of 1 but it will only give 1 item so its a good spot for grinding. Also there are a LOT of chests lying around for you to grab, and they'll often give you clubs. You may want to keep some clubs to clear #98, put the armor on every characters, and if you already had enough, donate/sell them as you feel like.
- Doing it the 4th time seems to load this area with gold coin pick ups?
- This is a good quest to grind your characters early on in the game without worrying about random encounters.
Quest #84 : Rumor of dancing lotion
To unlock: Get a "Lotion A" or "Lotion B" or "Lotion C".
Type: ADV
Location: CITY, Copa Empire
Rewards: 3 CP (once only), #85
Quest #85: Making The Dancing Princess Lotion
To unlock: #84
Type: ADV
Rewards: H-scene with Atago, and she joins your party (She's also granted the skill 舞姫, which restores all of an ally's moves by 1 in Rance Quest, and 2 in Rance Quest Magnum.)
Quest #86: Highway Yankee
- To unlock: Do #36 once.
- Type: Exploration and battle
- Location: Highway near CITY
- Difficulty: 4
- Maximum Acceptable Level: 9
- Rewards: 10 CP, Soul Shackle (魂の枷) , Ahoge (optional), #87.
Your first quest that's a bit challenging. It's recommended you have Prima, Mahoko and Megadeath recruited and have 1 charisma level before you start this one. Start with all 5 except Mahoko.
First time around you won't have enough moves to wander around and fight every single fight as even random encounters are often 4-5 enemy mobs that take a lot of your attacks to kill. Just keep going east. Grab what you can that comes within sight but don't stray away from the highway too much.
In the second area, take the north path at the fork in the road. There will be a tent with a green star event at its door. To the lower right of that there's a green exclamation which lets you read a porn magazine. You'll be given 2 choices, which one you choose will decide what you'll get at the end of this quest.
You'll have to cross 2 areas total (using purple portals) to the east, then in the 3rd area, head to upper right of the map following the highway. If you're doing this after #67, see note at the bottom. There are 2 green star events that let you fight against 1 yankee each (optional), then finally a red exclamation mark event, this will be the final battle of this quest.
It might be a good idea to switch in Mahoko with perhaps Prima or Megadeath (or Suzume, because she's likely to run out of moves the fastest because of her speed) and save the Rance Attack for this fight.
After this you get the Soul Shackle. Also you get an Ahoge if you chose the 2nd option at the porn mag event (only the first time). That's it, you're done.
- Doing this quest after clearing #67 gives you a bossfight against Bard and Matilda as soon as you enter the 3rd area. Winning will give you a HCG with Matilda.
- Above event may repeat depending on your level, 4 times in total. The exact same events may also trigger in Malgreed Dungeon Floor #1 in the same order if the requirements are met.
- The black bracelet seems to have no battle use - it just makes you come off the party after every battle... However, it is required in the Magnum storyline.
- Reading the porn magazine (1st choice) gives you a CG of a girl being beaten up by yankees.
- Choosing not to read it (2nd choice) or not even doing that green event gives you the Ahoge along with the bracelet. You don't get the CG on that occassion though.
- Both Bracelet and Ahoge will be given only the first times (in case of Ahoge, the first time when you make the 2nd choice).
- In order to do #87, you must have let the girl (Pettan) get beaten up by yankees in your last successful attempt at this quest (choose to read the magazine).
Quest #87: Yankee Go Home
To unlock: Clear quest #86.
Type: Exploration and battle
Condition: Let the girl get beaten up by yankees (read the magazine and see the CG in the end) in your last successful attempt at #86. If you chose not to read the magazine (Ahoge route) in your last attempt, you'll have to replay that one again.
- In v1.600 or Magnum, you just need to let the girl die once, what you did in your last attempt won't matter.
Location: Highway near CITY
Difficulty: 6
Maximum Acceptable Level: 11
Rewards: 5 CP, #116
The levels are same as #86. Only this time, in the 3rd area, go straight to the middle right (don't confuse with another cave entrance at the lower right end of this area!) end of the map where there is a cave entrance and enter the cave by touching the green exclamation event. There, walk to the right and trigger the green event in the open space (apparently optional). After that head to the left (avoid the red mines unless you're loaded with moves... still beating them all seems to be difficult), down, then right, then to the bottom where a red exclamation event exists. Beat that battle and the boss, Gates 95, will die.
- Rare encounter warning: Sometimes, in a random or a red mine encounter, you might end up in a fight with 3 Bones (skeletons wielding bones as weapons). They're very powerful for this quest unless you're overpowered, and would 2-hit KO about anybody (including even Rance, usually) at around 15-17 level. Use the best you've got to take them out as fast as possible, including AoE moves and your strongest melee moves.
Quest #88 : Sacred place of monster users

To unlock: Requirements: Have Krook in your party
Rewards: A book of girl monster.
Beware of getting lost!!
There are 2 same ways in this map.
First is NORTH NORTH NORTH <<< This is the wrong way you will get only no ! green event.
Second is NORTH RIGHT NORTH NORTH <<< This is the correct way.
Go through the correct way you have to fight 2 red ! events before finish at the green ! event.
In the first red ! event you will get "A book of girl monster" item after the boss fight. The boss is Leo from Galzoo Island and his Captain Vanilla monster from the game.
Note that you do not need to finish the quest and can in fact just walk out through the green door in the previous square if you want to keep the item. This item will allow your Civilian class characters to use Gal Monsters in battle. You will need to equip the book to learn new skill. After you learn and max that skill (it takes 18 skill points total) you can replace the book with some other item. Even after H-ing the girl, the skill won't be removed. Be careful, if you remove the book before maxing the skill, you won't be able to raise it's level until you equip a book again. Different level of skills allows you to use different levels of gal monsters - from weak, like Kyankyan, to very strong, like Captain Vanilla or Toko-chan. If you skill level is insufficient, then even though you equip the girl, she won't appear in the battle.
Quest #89: The Magical Girl Idol
To unlock: #68
Rewards: After finish this quest, you can recruit Kapalla by #16, + [HCG]
First, go to the upper block and fight 5 men in the first red ! event of that block. Then, in the same block, find another red event to battle one man. Then go to the upper block, go along the way until you find the last red ! event, beat 1 man. Find the green ! event in the same block to clear the quest.
Quest #90: The Hikkikomori Girl
To unlock:
Rewards: The witch joins(+H), #38
Just explore and you will encounter a red event in the fifth block eventually. You will find a Honey taking goods to the witch, you will follow it, and meet the Witch that loves staying at home before getting into a fight
Note: Her "Hikkikomori" passive ability gives her a 20% chance of leaving the party after every battle, so be careful when using her.
Note: You can also see Maltida here when you're at an appropriate level.
Quest #91: Evo Forest
To unlock:
Rewards: Kibako join (+H)
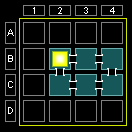
Go right, right, down, left, and left. Along this route, you'll find some green ! star events that involve Kibako. In the last scene, after the last ! event (the progress bar should be almost full) head to the southern center square to find the red star with a giant whale boss. The boss does large amounts of electric damage, so be prepared. There's also a healing pot, two mini-whales and a ChappuChappu.
Quest #92 : The cursed princess
- To unlock:


- Rewards: Zima joins, CG 72.
- Acceptable level: 34
- Description A girl is cursed, and of course Rance would go help. Navigate through the dungeon and find the cursed beast. After defeating, Rance must decide whether to kiss it or not. If he doesn't kiss it, quest fails.
- 100% Iron Armor X (アイアンアーマーX) from room C2
Tips: You can use Assasinate for instant kill this black beast.
Quest #93: Dragon Slayer
- To unlock: #72
- Rewards: 20 CP, Armuz Ark (H and join in #16)
Go east, trigger green star, east, east, north, west, green star, west, west, north, north. Trigger a red star here and Rance (only Rance) will fight with Ark (level 44) against a dragon. Enjoy the H after that (don't try it in reality if you value your life).
Ark's Solo Fighter skill increase her number of attacks by 1, decrease damage by 1/2 (50% chance) when there're 3 or least people alive in the party. She also has 5 white skills that TRIPLE her damage against certain enemies (most of which are high level monsters).
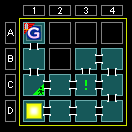
yellow: start point
green: an event with ark
red: finish point
Note: You can put Lia in the party before last battle to get double charisma even though she's not in the party since it's only Rance and Arms.
Quest #94: Queen of Monsters
To unlock: #72
Location: Hazard Sector #33
Difficulty Level: 39
Rewards: Onoha Mesubosu Joins (+H), Happy Kyankyan A2
Your party will be in a boat. Just head straight down to each block. Each block you'll be in a scripted fight. Go all the way to the bottom-most block and look for a red ! event. Watch and clear.
- NOTE:
You need magic in order to have Onoha join you. I swaped her in before the Red ! event. Quest 16 didnt show up until i did it.Just close the game and open again, #16 should be available.
Quest #95: Ero Yakku ALV
- To unlock: After #75?
- Location: Hyper Building
- Difficulty Level: 40
- Rewards: Satera (H Scene)
You'll need Athena Number 2 (あてな2号) in accordance to do this quest. Upon entering, quickly go to the top left to activate the green event. There will be 2 options, I don't know whether it will affect anything as both options seem to bring you to the next similar stage (I picked option 2, not sure about option 1). (Both are same).
After entering the second map, quickly go to the bottom right (you'll need to climb an escalator to see the next green event. Also, this map has very high encounter rate, I have stealth movement on and still the monsters keep coming while moving, so quickly finishing the quest is the best option). After triggering the green event, you'll need to collect 6 5 mini-ninjas for Satera. You will encounter the mini-ninja after every normal monster fight. So, don't move away from the green star and just circle around it to collect the required ninjas. After the quest bar blinks, just pass to Satera for the H scene.
Quest #96 : Ika-man's wedding
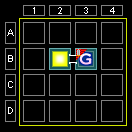
To unlock: #68
Location: Ika Ika Ika Dungeon
Type: Exploration and battle
Difficulty: 12
Maximum acceptable level: 17
Rewards: 10 CP, Bernard Seramite (Optional)
Just go East to find a purple teleportal to the 2nd area. In 2nd area, there will be 4 green exclamation events and 1 red exclamation event (which is the final battle). If you go straight for the red one, it will have Kraken being defended by 4 powered-up Ikamen (Squidmen) that will deal heavy damage to your party. If you go at the green events first, each of them will have 1 ordinary squidman (with some companions), each of them being one of the 4 guarding the Kraken. Killing them will let you go the divide-and-conquer route, taking out all of them seperately and leaving Kraken alone for an easy fight (as your client will recommend). The quest can be completed either way (divide-and-conquer will actually give you more exp), but if you go straight for the Kraken (red exclamation mark event) without doing any of the green ones, only then after finishing the quest Bernard Seramite will join you.
- After getting Bernard, feel free to go the coward way if you want more exp out of the boss battles!
Quest #97 : Monster Hunting
To unlock: After Onoha Mespos (オノハ・メスポス) join at #16.
Location: Swamp

Follow the red line or paths will not open
Difficulty: 30 Rewards: 10 CP, unlock #32
Type: Exploration and battle
Condition: Onoha Mespos must join the party
If Onoha is not in your party when moving to a different block, the quest will fail. You may switch her out during other times.
On the first time you do this quest, the red path must be followed. Otherwise, if you're repeating the quest, head straight towards the goal, which has a boss fight against two giants who can instant kill character under (and including) Level 35.
This is a good place to level-up characters from Level 1 to Level 35. Since you don't want Onoha wasting a slot for leveling one more character, you may simply switch her in only when changing blocks. Or you may escape your way to D4 using Crane, take out Onoha from the party, and then start grinding there.
Quest #98 : The Honey Who Eschewed Weapons
To unlock: Clear #33.
Location: Hidden Hometown of Hanny
Type: Exploration and battle
Condition: No weapon except clubs (こんぼう) and mage staffs allowed. Or else the quest fails. Also no swapping once the quest starts.
Difficulty: 8
Maximum acceptable level: 13
Rewards: 10 CP
There are a bunch of red exclamation events randomly scattered around. Trigger 2-3 of them and fight the battles (you must win before time runs out or else you'll have to redo it). The last one is a bit harder than the first. There are also random encounters but avoid them as without weapons they'll be pretty hard to kill. Also the area is rigged with traps so bring along Suzume. Note that no swapping is possible in this quest, so think well. Sparters have good attack even without weapons so they might be a good choice. Avoid using mages as magic doesn't damage hanny (even though there will be enemies besides hanny).
Quest #99 Harvesting Season
To unlock: Clear #17
Location: Strotsend
Type: Exploration and battle
Condition: Mahoko P. Masai must be level 20 or above and be in your party, and your party must have 3 or less members in total (i.e. only 2 more people besides Mahoko).
Difficulty: 14
Rewards: 10 CP
There will be a lot of red mine events here. Keep beating them and the quest completion bar will keep filling up. Once it's blinking, look for a red exclamation mark (to the extreme left of the map). Beat it to clear the quest.
This map also has random encounters aside from the mines and the bossfight, and you only got 3 characters to fight with, so don't fool around too much, ration your moves well (and God forbid you come across the bones here... )!
- You'll almost certainly need Rance's supply of moves to last through the battles. As for the third person, either choose a guard or a healer, unless Rance can really tank well for that level. In that case, take another very powerful hitter, perhaps like Alkanese/Kenshin or Shizuka.
Quest #100 : Kicking Demon at Mushroom Forest
To unlock: Clear #60.
Type: Exploration and battle
Condition: Rance must be in the starting party, but you'll lose him in the very beginning (see description)
Location: Mushroom Mountain
Difficulty: 17
Rewards: 15 CP
Rance must be in your initial party, but at the very beginning of the quest, he will become incapacitated and will be unusable for the rest of the quest, thus making you start with 4 members. This is an intended handicap. You can of course swap in more characters from here onwards as per your charisma (except Rance).
An interesting quest. There is trap everywhere, so you dont have any choice except to walk over it. In some cases, you'll have to choose between trap or red fight (?). So, bring someone like Suzume with you. Just keep moving until you find a red exclamation mark. You will fight 2 Gates 95 and 3 Yamorin which would have been a piece of cake with Rance Attack, but since Rance can't fight in this quest, you may want to fill up the backline with powerful AoE mages. Yamorin are weak vs Ice, Gates 95 against thunder. Impulse (hammer AoE) will help too.
- There are spots where you can avoid all traps though. Just be careful to walk very close to the edge of the roads and you might be able to avoid them.
- If stepping on traps, the following can help you evade it safely: Suzume, Crook, Merim etc. Each of them also let you open red chests.
- The traps, if triggered, are mostly lethargy mushrooms and will remove one party member permanently (and make him/her unavailable for the rest of this quest). Remember these in Galzoo Island and Rance 6?
Quest #101 : Spring - Hanami (Sakura-party)
- To Unlock: Clear #20
- Rewards: All characters under lv 40 gain one level.
- Requirements: 20 CP Shizuka Maria Elenoa Mile
Quest #102 : Summer - Beach
- To Unlock: Clear #20
- Rewards: 20 CP, and all characters under level 40 gain one level.
- Requirements: Kouhime, Kenshin, Yuzuhara Yuzumi and Noir join
Quest #103: Autumn - Sport Festival
- To Unlock: Clear #20
- Requirements: Magic The Gandhi, Karma, Urza Puranaaisu and Kaloria join
- Rewards: 20 CP, and all characters under level 40 gain one level.
Quest #104 : Winter - Onsen
To Unlock: Clear #20
Requirements: Lia, Kanami, Alcot and Childie join
Rewards: 20 CP, and all characters under level 40 gain one level.
Quest #106 : Dark Alice's Lesson Room
To Unlock: must have created at least one custom characters(?)
Here, players can spend gold to improve their custom characters. In the quest's main menu, there are 4 main options.
Option 1: improves a single stat, and can only be done once.
Option 2: allows players to buy skills, both beneficial and harmful in nature (certain unique skills such as "together with Kenshin", "fame advertisement", etc. can be purchased). Can be done multiple times.
Option 3: changes character speechs (when performing an attack, etc.)
Option 4: changes Rance's evaluation of that character. If you accidently made the character underage by choosing the wrong options (see custom character creation - evaluation section), you can undo this effect, and vice versa. Can also change the character's opinion of Rance (not sure how this works).
Option 1 and 2 are pretty expensive (buying a stat boost and all blessing - 0 star, I believe, costed me 30k in total). Option 3 and 4 are free.
Quest #107 : Alice's support center
To Unlock: Install Magnum patch
Rewards: Reset to level 1, exchange absorbed item with currently equipped one, Change difficulty to EASY and other miscellaneous settings.
Player can choose from characters in the current party to reset level to 1, or to exchange absorbed items with currently equipped one. Using this, player can replace low level item the character have absorbed before with better item of their choice. {C}There seem to be a bug here: After the exchange, the top item slot appear to be empty but it actually have the exchanged item equipped. If you place another item on the slot, you will see the stats get lowered because the "invisible" equipment is replaced by another.
Quest #108 : Bear Deathmatch
- To Unlock: See Kuma's Quest #134 scene.
- Difficulty: 30
- Reward: 2 CP
- Requires: Kuma
There is a limit to who you can bring to this fight. Best guess is they need to be lower level than Kuma (I was able to put any character of the exact same level as kuma in the party, both lower and higher level characters got bounced). The boss has high evade. Expect to redo this a few times. 100% sure Arms and Lia can join.
Quest #109 : Bear Deathmatch (Rematch)
- Difficulty: 50
- Reward: 2 CP, Kuma's 3rd wife skill (50 Def/Mdef)
- Requires: Kuma level 40
Another fight involving Kuma. Significantly harder than the previous one. Party members the same level as Kuma can join.
Quest #111 : Lending of Monster Girls 1
- To Unlock: capture/equip monster girl?
- Difficulty: 30
- Reward: 10 CP, unlock quest #112,
- Requirements: Must have captured 97chiha (tank), Yamorin, Kraken
No encounters here. Walk around behind boss for a chest with a Resistance Crown (A Rank, +10 status-effect resistance special item) before fighting it. The boss in the middle has about 2000 HP. The doppelgangers on both sides have HP depending on the characters they're copying.
- The Okayu Fever, the boss in the middle, has a decent physical attack and an AoE fire attack. As long as you're high on fire resistance or at around level 30, he shouldn't be a problem, especially with a healer around.
- The two enemies on the side can be a more serious problem; they're "コピペ" or "copy-paste" i.e. doppelgangers, who will randomly copy the skills and possibly stats of any two characters in your party, so if you have a strong Rance, Kenshin or Shizuka etc. in your party and they copy those characters, they'll hit you for painful damage. Their names will tell you who they're copying.
- Having a party heavy on powerful AoE mages and guards might make this easier, since the doppelgangers don't seem to use AoE magic attacks very often.
Quest #112 : Lending of Monster Girls 2
- To Unlock: #111
- Difficulty: 30
- Reward: 10 CP, unlock quest #113
- Requirements: captured Maid-san, Chappu-Chappu, Frog girl
No encounters here. Walk around behind boss for a chest with a Belt that has impact (10 stun accessory)before fighting it. Same boss as #111.
Quest #113 : Lending of Monster Girls 3
- To Unlock: #112
- Difficulty: 30
- Reward: 10 CP
- Requirements: captured Tokko-chan, Magician, Zashikiwarashi
No encounters here. Walk around behind boss for a chest with Avoid Rice with Tea (+10 evasion A-rank morurun item) before fighting it. Same enemies as #111.
Quest #114: King of Hell
To unlock: Clear #83
Type: Exploration and battle
Location: A labyrinth somewhere...
Difficulty: 30
Rewards: 15 CP
This one appears fairly early but DON'T TRY THIS until your key characters are at least level 25+. Look at the difficulty rating before clicking!!
There are no random encounters. Just walk up to the altar, click the big red exclamation mark, and good luck. Switching is allowed both in map and in battle.
Tip: if you have the shadow charm on for your party (4th item slot under weapon, purple bag) it will help lower the shadow aoe damage he dose to the party also haveing a healer with healing rain can heal the whole party when hit with the aoe. Can NOT stun the boss so big heavy hitters boss dose not evade much at all.
- The Dark AoE attack debuffs your entire party's attack, so have a tactician (Kouhime, Uruza, Alcot) who can remove debuffs or buff your attack back. If you have 2-3 characters with level 30+, this battle should be easy.
Quest #115: True King of Hell
- To unlock: Clear #114 (and 177 in Magnum)
- Difficulty: 50 (58 in Magnum)
- Rewards: 30 CP, Ability to change world (#14)
The final boss of the game.
This boss Masuzoe has 3 moves
- Recover 3000 HP, and all debuff stat
- Honey Flash, damage random target around 1000 hp 3-5 times (1500 Magnum)
- Seize, to remove one skill from each of your characters
The item that repel honey's attack cannot be used, and Arm's ability to deal triple damage against Hannys won't work either. Magic does no damage.
In order to win, these factors are necessary
- Poison will deal 999 damages each time Masuzoe gain turn. But he will recover often. Kouhime Dango100% Poison or Suzume which neglect 1/3 damage or Kanami that can deal a lot damage are good choices.
- Damage dealers x 2, the best job for characters such as Rance, Kenshin, Rizna, or Arms.
- Debuff this gonna be the work of Sparta's Debuff Punch or Rizna's Jackdine, in order to reduce Masuzoe's damage as much as possible, pray for debuff atk from your sparta.
- Guard or Healer or Def buffer, The last spot in your party can be either Guard or Healer. In case of Guard, I recommend Kaloria for her 1/5 damage received or Kouhime with Dango or Sachiko if you gain her level enough. In case of Healer, no one suit better than Crook. Or you can use Def buffer, the def buffed is very difference with no buff. Urza has "Preemptive strike" skill (先制攻撃) so usually she has 2 turns in start of a battle(50% at 3 stars AND it works on all archers.For example if you have Maria - so she will have 2 turns in a row also) that can give you chance to buff your team and deal some damage with rapid fire (弓連射) - 7 times x 0.7(ver 1.10) damage with maxed passive skill
But at last, the most dangerous skill of Masuzoe, Seize, is very troublesome. So preferably have damage dealers with 5-6 skills and other have more than 4 skills in your slot. (You don't have to worry if you kill him fast enough though. 3 skills should be enough.) Or else you will see your characters stand still doing nothing until you game over, if Masuzoe cast Seize 4 times.
After you defeat this quest #115, you will be able to start the second round by #14.
When you play the fifth round, Honey King and four minions will take place of this quest instead of Masuzoe. Note he won't take triple damage from Arms either. and he is MUCH harder then masuzoe. having a move that can one hit kill (THAT IS HIS ONLY MOVE) is pretty much hard itself
I defeat Masuzoe 1st round by
- Rance 43, 5 skills (Rance attack, Attack 3 are main) ATline
- Kibako 42 M1, 5 skills (Debuff punch, Armor destroy punch, Attack 3 are main) ATline
- Kouhime 39, 4 skills (Tactician level max, Attack 1, Shield attack are main *for poison) ATline
- Katsuko 44 M2, 5 skills (2-4 times spear attack, Attack 3 are main) DFline
2nd time I changed
- Katsuko to Alcot 43 M0, 3 skills (Buff Def all, Captain Vanilla) DFline
- Krook 40 M1, 5 skills (Alice attached, Heal3, Healing rain1 2, All recovery are main) DFline
400px
Quest #116 Chiha Tank Brigade
- To unlock: Unconfirmed: Clear any 1 or 2 of the following (?): #66, #84, #87
- Type: Exploration and battle
- Location: Gutter Canal Plains
- Difficulty: 11
- Maximum Acceptable Level: 16
- Rewards: 15 CP, 1x/2x Cardboard Armor (Optional, Indefinite)


This is an interesting sidequest. The 97 Chiha tank girls are fighting a war against the yankees. Check out the locations for each side in the map beside and help the girls out for the boxes. You will get to fight 5 battles (red exclamation marks; there are no random encounters in this quest) after which the quest will end. If 4 out of the 5 mobs you fight are yankees, the girls will win, saluting you at the end and giving you 1 or 2 (at random) Cardboard Armor (+15 P. Def) everytime you attempt this quest, meaning you can get a supply of these endlessly. Fighting tanks will give you 75 exp, while hooligans just 50 exp. So this quest is also a decent place to level up your newly recruited characters early in the game.
- Because 97 Chiha tanks are considered monster girls, this map could be the easiest way to complete scroll requirements to recruit new characters in #16
- If 3 (or less) of the 5 mobs you fight are yankees, the 97 Chiha lose and will be raped by yankees (no CG is shown though) and you don't get the Cardboard Armor. You still clear the quest though, and of course you can try it again.
Quest #117: Use Kugu's Torture Machinery
- To unlock: Clear #45.
- Rewards : CG
- Description: Seek out the 3 broken fragments in the Mazes. Upon completion, you get a H-scene. Dungeon: マルグリッド迷宮. A is in floor 1, B and C in floor 2. Chest location is fixed.
Quest #118: Torture Machine: Challenge 2
- To unlock: #117
- Rewards : CG
- Description: Seek out the 3 broken fragments in the Mazes. Upon completion, you get a H-scene. Dungeon: マルグリッド迷宮. A is in floor 3, B and C in floor 4. Chest location is fixed.
Quest #119: Torture Machine: Challenge 3
- To unlock: #118
- Rewards: CG #64, unlocks #181
- Description: Seek out the 3 broken fragments in the Mazes. Upon completion, you get a H-scene. Dungeon: マルグリッド迷宮. A is in floor 5, B and C in floor 6. Chest location is fixed.
Quest #121 : Malgreed Dungeon 1st Floor

- To unlock: #67
- Type: Exploration and battle
- Difficulty: 13
- Rewards: 10 SP, 600 Gold(need confirm), #122, Masou Shizuka (optional), Kuma (optional),クグの破片A in C3.
- Magnum Guage Bonus: (5)Ninja Blade
You have to find the finish line here to get 600 gold. Mobs are easy so shouldn't be a problem. It can get challenging if you try to clear 5 red mines and 5 markers for equipment bonuses though, you'd need 5 charisma to have an adequate supply of moves.
Yellow Area - First map, go right to a purple teleporter.
Goal Area - Directions: ➡➡⬇➡ to reach. There's a red exclamation event, has 3 Green Hanny at front, 2 Uppi at the back. Beat them to get past and reach the goal.
A3 - May commence a boss battle against Bard and Matilda. It'll have priority over other events, which may occur when changing areas. If this is the first time you've fought them, then they won't appear again until Level 22. You'll also have encounters with Matilda at Lv 35 and 38.
Green Area - On this map there are two green events at a time. One lets you meet Masou Shizuka ONLY IF Rance is not in your party, and after that she joins you. The other green event is a Happy Rabbit encounter. There's no way to distinguish between the two, so may want to reset if you're saving up Happy Rabbit encounters for some reason.
- A4 fixed ninja blade
- B4 has poster encounter in red mine
- If you change area with only two party members, Kuma will join.
Quest #122 : Malgreed Dungeon 2nd Floor

- To unlock: Clear #121
- Reward: #123 | 20CP
- See the map in quest #121
- Max lvl for full XP: 25
The order to get through the labyrinth this time is right, down, down.
The scroll for recruiting Elenoa Ran is at right, down, down, right (C3).
One of the quest items for Quest #117 is right, down, right (B3). The other one is right, right, right (A4).
There is a scroll in the fixed box in C3 (right, down, down, right)(confirmed)
Quest #123 : Malgreed Dungeon 3th Floor
S = Start

G = Goal
scroll (ミル) :C4
クグの破片A (quest item):D3
Green escape portal :D4
Quest #124 : Malgreed Dungeon 4th Floor

goal: down down right right up (or down right right [shortcut?])
Quest Item: クグの破片B at A4
Quest Item: クグの破片C at B1
Green escape portal: A1, D3
A4: Green star event for Maria to join
- A3: Maria Green Star Event if you bring Masou Shizuka (confirmed)
- D4:lucky bunny
Quest #125 : Malgreed Dungeon 5th Floor
This time is down down right right right up up left left down down right up up.

From the red spot map, you may instead head south(down) twice, thus creating a shortcut for future uses.
S = Start , G = Goal
Quest Item: クグの破片A found at the bottom left-hand corner of the map (D1). Current map does not show the square with the item.
Quest #126 : Malgreed Dungeon 6th Floor
In this dungeon, there are two paths to take. All 16 squares of the map exists.


You can take down down down right up right, or right down right up right down down down left up to reach the goal.
Beware, as the giants can 1-hit KO lv 35 and below characters.
The boss is a single Stone Guardian. Simply stun it while others inflict high damage on it. No known weaknesses (although Arms can deal triple damage against it), so just smash it to bits. It's so easy compared to past bosses. You can also assasinate it.
{C}-Lucky rabbit at C2
- #119 Quest item (B) and (C) at B2 and A3.
Quest #127 : Malgreed Dungeon 7th Floor
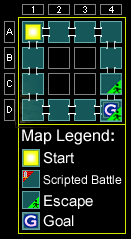
Look at the map for easier navigation.
To reach the goal, you can either pick east route or south route. There are 2 escape portals at C4 (here, its position may vary) and D4.
The boss battle of this dungeon is consisted by 3 of the same monster you faced in Quest#114. Their strong points are in both Defense and Magic Defense, while on the other hand, their ordinary attack isn't that much of a threat. It's recommended to bring at least one heavy hitter who can hit one row in a single attack such as a fighter with 列車斬り/Train Slash learned. Alternatively, you can also use magicians with a strong magic attack to deal a moderate amount of damage to all of them.
Quest #128 : Malgreed Dungeon 8th Floor

This dungeon is very hard without proper equipment. Monster mainly consist of battle tank and helicopter, which seem to always deal critical damage. Aside from that, after each battle AND location change, your active team will lose 1/8 of their maximum HP due to being shot by a cannon from A3 so have someone that have lower encounter rate skill ( 隠密移動 - Stealth mode ) in your active team and quickly go there to finish the cannon first, or you'll be creamed by the time you arrive at the boss.
As for boss battle, either finish the 3 front tanks or kill the bat in your turn. Otherwise it will be very tough since the bat's attack is an aoe that has a high chance of stun, thus disable your guard and the tanks hit pretty hard for those who physical defense lower than 600.
Quest #129 : Alice's Guest
- To unlock: Have 'Chara Ticket'
- Rewards: The character which you created joins.
- Description: The maximum for custom characters is 10.
NOTE!!! Buy the Chara Ticket (キャラチケット) from the item shop under the 'Others (アイテムその他)' category for 2000 Gold. With this quest and this ticket you will be able to create your own custom character.
Quest #135 : Honey's Secret Base
To unlock: Clear #125.
{C}Requirements: No one in the party must be >=LV25. If there's any1 over or even LV25, you won't be able to fight even a single Hanny here.
Just beat a bunch of hannys, then go up and do a red star event. The final red star event is a bit tricky, cause Zashiki-Warashi seem to kill any character lower than LV25 with one hit, so I advise having a defender to defend the most powerful character. Note that in a place where there are 2 red crystals(like a kinda gate), there is a green star that will if triggered have Rizuna join your party upon quest completion.
To get Rizuna and beat the quest, Prepare "Rocky" with intinate guard and auto revive item equiped (alternatively instead, bring in Kaoru Quincy, if you still have her below Lv25, since she can take a deathblow before actually be KO'ed), "Merim" with enhance HP, "Old hag" with hanny's charm and full party revive ability(完全復活), Save gunner's Volley ability, and Lia's lighting dragon x 2 for the fight.
Red Crystal fight can run away or waiting for time out. Quest complete bar will still moving. After 3 red crystal fight, switch a lv 25 character into the party to avoid all random fights.
This map only serves as a grinding location, and perhaps to catch galmonsters?. There are no chests, nothing other than battles. Each battle reaps you a base 1000EXP, irregardless of the number of enemies you killed. The only thing determining the EXP you get is by the multiplier from the number of kills. killing all 5 enemies give 300%, meaning 3000 EXP for a battle. However, you can always play defensive and kill one enemy per round, earning 1000EXP for 1 kill.
One suggestion on tackling this map, provided you can switch characters around 10 times:
Prepare 4 lv 24 and below characters and 1 lv 25 or above character. Go in, gather EXP orbs, then seek a good starting point (Near Rizuna for first try, near boss on others?) and change your lv25 or above character to another lv 24 or below character, and start farming. Bring in a healer or defender, especially if the healer can do a full party resurrection(完全復活). The old hag from the store may be a good choice(capped at lv20, have skills to heal and revive). Despite having really low HP, you can equip her with the accessory to negate all damage from Honeys. It is best to prepare and save up a good party for the final fight should you want to complete the quest, otherwise, its perfectly okay to abandon or lose that final battle if you are in it just for the EXP.
Quest #136 : Cockroach Extermination
- To unlock: Visit Rance Castle while it is cleaning time (available in patch 1.1), then do quest 13.
- Reward:
- Description: Clear the dungeon of some silver blobs.
Quest #137 : Cockroach Extermination Continued
- To Unlock: #136 cleared, try to enter Rance Castle while it is cleaning, then do quest 13.
- Reward: Can enter Rance Castle anytime
- Description:
- NOTE!!! Clear the dungeon of more silver blobs. This time, when you defeat the blobs in each red spike, what attacks you used to defeat them will determine the resistance of the other silver blobs (For example, if you killed them with a sword, the other blobs will gain an EXTREMELY high resistance against the sword. If you used Ice magic, then their ice magic resistance will go up, etc.)
- NOTE!!! It seems silver blobs do not have any type of resistance against brawlers (aside from their inherent defense), and blobs randomly select a type of resistance if they get killed off only by brawlers.
- Can someone confirm this? It seems like the blobs also do not develop resistance against Torako's shikigami attacks at all.
- It seems they also do not develop resistance against blunt weapons like clubs or Copandons Oracle Box.
Quest #138 : Biscuitta Participation
- To Unlock: #137 and #23
- Rewards: Biscuitta joins.
- Description:
NOTE!!! She cannot be H'ed by Rance. So her level can't be reset by that method. In Magnum 2.0 you can H her normally just as any other girl.
Quest #139 : Subdue Chaos Squid (Rangers only)
- To Unlock: #64 (need confirm) Confirmed.
- Rewards: 5 CP
- Difficulty: 32
- Description: Rangers only. Basically, its Suzume, Kanami, Karma and Klein. Just a single, small circular map with no encounters, just traps. Start at 12 o'clock, walk around to 6 o'clock and red star boss is in center.
- Clearing the quest for the first time gives a Skill Return and Forbidden Talent - Weak
*EQUIP CLUBS* You will not do damage otherwise.
Enemies seem to be immune to assassinate, Klein's weapon works as well
Quest #140 : Subdue Chaos Bone (Underage only)
- To Unlock:
#94(Might need Mill Yorks,got this quest only after getting her. Completed 94 long time ago.)Complete #64 to unlock this. #94 isn't required. - Rewards: 10 CP
- Description: (Foreword: Sorry for the lack of details, but whilst I am unsure of the names and other stuff, I finally got this to work and would like to share it with the rest of us Rance Quest fans.) To clear this quest, your party must consist of only underage girls. Basically, its Kou, Onoha, Miles York and Karma Atlanger. Just a single, small map. Find the red star, beat the boss and clear.
- Clearing the quest for the first time gives 30k gold and a Forbidden Talent - Weak
Quest #141 : Subdue Chaos Rorunta (Mage only)
- To Unlock: #64 (need confirm) Confirmed
- Rewards: 10 CP
- Description: (Foreword: Sorry for the lack of details, but whilst I am unsure of the names and other stuff, I finally got this to work and would like to share it with the rest of us Rance Quest fans.) To clear this quest, your party must be Mages only. Note that, like all other quest in this series, you cannot switch characters once you enter the dungeon. Therefore, even with more than 5 mages, you cannot switch them in. Reccomended to have your frontline mages equipped with the Magic Shield ability. Also, the monsters in this dungeon, though all the same, have different elemental resistances and weaknesses. Therefore Torako is useful, as her attacks hit the monster equally ignoring elemental resistance. Another good mage in your party is Emmy, who attracts the monsters to concentrate on her and can tank damage due to her incredibly long life, if you raised her correctly. Once in the dungeon, evade the traps, find the red star in a room and kill 5 monsters. Take into consideration elemental resistances and weaknesses.

Quest #142 : Subdue Chaos Uppi (Cleric only)
- To Unlock: #64 (need confirm)
- Rewards: 10 CP
- Description: (Foreword: Sorry for the lack of details, but whilst I am unsure of the names and other stuff, I finally got this to work and would like to share it with the rest of us Rance Quest fans.) To clear this quest, a party full of healers/clerics are needed. Any other members e.g. Swordsman will automatically cause the quest fail. Basically, Just bring Crook, the old lady and all the healers you have. The quest is straightforward in one small map, with green stars that allows you to heal injured people , who give you an exp boost bonus (unless you choose the last 2 bonus, to encourage them or to watch, in either case they die and you get nothing). Monster Encounters are still present on this map. The red star initiates a boss battle, with a red Hanny, a light Uppi and a Special Uppi. Just make sure your other healers keep Crook alive, if she is your main attacker.
Quest #143 : Chaos Den
- To Unlock: #139-142
- Difficulty: 35
- Rewards: 20 CP
This dungeon is filled with the bosses from Quests 139-142 but you can use your regular party and switch around normally.
C3: Head west to C2 and try to take the exit at the west end. Go back to the Green Star in C3. Touch the green star and choose the first option for (?? Bloomers). At the red star fight 2x Ranken, 2x Bone M and ??Samurai. I think you took the Samurai's bloomers.
Quest #145 : Malgreed Dungeon 9th Floor
- To Unlock: #128
- Difficulty: 50
- Reward: 20 CP, CG #178, unlock Quest #146
Exits warp you around rather than being normal directions. Wrong exits take you to start of Block you are on.
001 Block exit North to 002 Block.
002 Block exit South to 003 Block.
003 Block exit East to 004 Block.
004 Block exit West to 005 Block.
005 Block exit South (directly east of where you came in though) to 006 Block.
006 Block exit East to 007 Block.
007 Block exit South to 008 Block for immediate boss battle with ?? Destroyer. Attacks everyone physically each turn for 700-1300. Use Uruza to buff defense and this should drop to 500-800. Worthwhile even if they immediately die after doing it. Kenshin's multihit attack and healing got me through this.
Now just kill the 5 helicopter red star and get the finish green star.
Quest #146 : Malgreed Dungeon 10th Floor

- To Unlock: #145
- Difficulty: 55
- Reward: 20 CP
- Magnum Gauge Bonus: Attack UP Set
Kugu Debris A at A2, B at B2, C at C2. Entering any of these rooms removes party members of one class.
This dungeon some exits remove every party member of a random class (in or out of party).
A1 start, D1 Boss, exits removing members: A1-A2, A1-B1, B1-B2, B1-C1, C1-C2?, C1-D1
Boss is 2 Z Guardian (1500 damage light? attacks single AND multitarget)
Quest #147 : Malgreed Dungeon X
- Difficulty: 62
- Reward: nothing

This is a random dungeon. You start unable to see the map. Example layout.
- A1: Start
- A4: Boss, chest with (5) Super Sword, Finish
- C2: green star event gives map
- D3: 20,000 gold and no enemies
- D4: green star event has level up bunny girl.
- (level may occasionally have an escape exit)
Map stars have an exclamation mark, other green stars are either bunny girl or asshole.
- IF you got the Happy Kyankyan but lose before reaching the green star exit, the next time you activate the quest, the green star will lways contain an 'asshole' rather than the Kyankyan until you (beat the boss) clear the green star exit.
- There are 2 special rooms that you may encounter (they are not always present) while traversing this quest. The first room contains loads of gold and no enemies. The other contains high level enemies, including ones that you haven't encountered yet. Don't linger too long in this room. You will always get a notice (with appropriate sound effect) when you enter one of these rooms.
First map I fought Part 1-5. They have about 800 hp and do 30 damage. Nice after a very long dungeon.
Second map I fought Papa Priyo which healed 3500 hp every round and I couldn't beat after the dungeon.
Third boss I fought a Destroyer (battleship), 3 copters and a submarine.
After a few rounds (9 I believe, the quest text will say something like 190-200) (bosses seem to be random up to this point) you will reach the final? floor which features a set boss "sheliphant" (real name pending) which so far used two different moves on me, one where he spits bubbles on the entire party for 3200+ damage, decent chance to dodge, another where he slams the entire party for 1200+ damage. He has a ton of hp and decent speed and so far he just utterly murders me before I can drop him below half hp even with my strongest party, elemental resistances don't help.
-Because it has a high chance of missing, you will have a chance to switch characters during the battle. The dungeon continues after this boss, I'm currently on Layer 29.
Tips:
- Use a pencil and paper to draw a temporary minimap, until you find the actual map. It will help you keep track of where you've been and which rooms have (may have) multiple exits, as well as help save you valuable time and skill points.
- It is recommended to always search for the Happy Kyankyan everytime you go through this quest. If you get to the boss room without encountering it, consider defeating the boss (switching from your exploration team to your boss clearing team and back) then continue to search for the green star before returning to clear the quest. Use/equip the special bloomers accessory (the red one) as needed. This quest may well be the ideal quest to grind levels, hoard money, while searching for rare items.
Since you won't encounter more Happy Kyankyans once you encounter the "sheliphant," you may want your team that will take part in beating this boss to be the ones to benefit from the first Kyankyans. Copandon is also one of the early viable candidates for easy levelling with regards to Quest # 155.
- It is recommended to field a strong exploration team which should include:
A high level guard with Shield Block max, for the usual defense duties. Try to keep his/her HP high at the end of battles, as you may find yourself unlucky enough to encounter those Artillery Hannys (?) that could decimate your team before you can even act. Make sure you to have replacement guards of good quality on standby. A medic w/ points placed on the white skill that recovers up tp 10% of the party's HP at the end of battle. An exploration ranger or better yet Crane, with Escape, Escape Tech (yellow - 逃げる技術), Stealth Move (yellow - 隠密移動) maxed and equipped, plus Chest Opening宝箱開け and Disarm Trap 罠回避 maxed. Rance with Escape skill equipped. Switch Atago in and out to use her Maihime skill, preferably on Rance to recover skill points on Normal attacks, Train slash (列車斬り), Rance Attack, and Escape.
Tips on "sheliphant"
Luck plays a large part in this battle, even with proper preparation. Its bubble attack can 1-hit KO most members of your party if it connects. Since this will likely be a long, tough battle, even 2 medics will not suffice as its bubble attack will eventually knockout both your medics by chance. Your best bet is to eventually have at least 3 medics on the field, plus Rance (your main damage dealer), and Atago to replenish his attacks. Your medics should have staffs than maces and have at least 3 points in the higher revive skill, and 2 of them should have a Hanny Zippo (and its orange skill) equipped. Also the more healing skills they can equip the better (don't bother with All blessing). You may consider equipping Rance with the Revival medicine (or a Hanny Zippo), or have Atago equip it, that is if you don't plan to have her equip a monster girl.
At the start of the battle, you can have Rance, 2 medics, a debuffer, and either another medic or attacker. Switch out the debuffer or switch in Atago, depending on how the battle goes. Switching in your medic late could leave you to be unable to use her when you need her most. Adjust your strategy as you see fit. It'll likely take a bunch of tries before you get lucky.
While trying to beat "sheliphant," and you found a rare item in a treasure chest, consider exiting via a green portal. You'll fail the quest but keep the item. Rare items are hard to find, and it may be while before you come across it again.
Quest #148 : Natto Sex
- To Unlock: Mahoko level 35?
- Reward: 5 CP, CG #179
- Requires Mahoko level 35
Mahoko level 35 scene.
Quest #149 : Life Goal
- Requires: Elenoa Ran level 35. Also requires a scene "(+ some other requirement, I have ran 35 but don't have this quest)
Quest will not show up until a scene with Ran has taken place while switching rooms in a dungeon (Must have Ran in your party).
Scene only.
Quest #150 : Ice Flame 3 Sisters
- Requires Megadeath, Prima and Cessna at level 35.
- Reward CG #185
Scene with above girls.
Quest #151 : Rasoukou Play
- Reward: 5 CP, CG #183
- Requires: Rasoukou (armour), Kanami level 45
Rasoukou is from Magnum Guage Bonus in Quest #127 : Malgreed Dungeon 7th Floor. Scene only. Does not Morurun Kanami.
Quest #152 : Olgarizm Play
- Reward: 5 CP, CG #184
- Requires: Orgarizm (armour), Shizuka level 35
Orgarizm is from magnum bonus in Quest #145: Malgreed Dungeon 9th Floor. Scene only.
Quest #153 : Makatto Bar Every Day
- Requires: Atago level (30?), completed #85
Scene only. Atago gains +1 to Dancing Princess (舞姫) skill
Quest #154 : Relaxing Boobs
- Requires: Meg level 35
Scene only. Quest fail if Reset haven't joined yet.
Quest #155 : フクマンいかがですか
- Reward: 5 CP, CG #186
Choose first option for a threeway for 30,000 gold.
Second option is to buy the girls as characters but costs several hundred thousand gold (basic price is 3 mil) putting Copandon in the party will make her lower the price depending on what level she is, for me it was at an "affordable" 820.000 with Copandon at level 54 (leveling her to that point is likely going to give you around this much gold, though it can apparently go as "low" as 500.000)
Price it shows is multiplied by 10,000 if you can't read it.
Quest #156 : Father's Gift
- Requires: Sachiko level 50
- Reward: final improvement to her self healing skill.
Scene only.
Quest #157 : Demon Satera's Request
- To Unlock: Quest #190
- Difficulty:40
- Reward:15, CG #190
- Requires: Demon Sword Chaos
Collecting Ninja bugs again. No random encounters, just a ton of red mines. You need to kill 10. Choose the second option during cg. If you are selective about which ones you fight, you can make it to the green star in the northwest area and get a handheld game, an ai phone, and a learning device. Make sure you select the second option or you'll lose them.
Quest #158 : Monster Girls
- To Unlock:
- Difficulty: 36
- Reward: 5 CP
Single room to easily catch monster girls in fixed and random encounters. Catch some and return to green star when done.
Quest #164 : Kawanakajima
- To Unlock: #77->#12
- Difficulty: 43
- Reward: 20 CP, unlocks #165,#202(Unlocked for me here,not sure why or if it's even connected to the story.)
- Requires Crook
Boating map. Head south, west, south, east, south. Boss is harder version of regular plant enemy in the area and has 2 of those with them. They all use area effect stuns. Boss has something like 15000 HP.
Quest #165 : Leader Rumours
- Reward: 5 CP, unlocks #166, #207
Non fighting event.
After this quest Polluted Humans may appear in red crystals on other quests. They may only appear once in each run. They drop Soul Shackles which you can exchange for Alice Coins at quest #166.
Quest #166 : AL Church Exchange
- Reward: 5 CP, 5 Alice Coin's, unlocks #167, 168
- Requires 5 soul shackles (魂の枷) found in Quest #48, #86, #207, or elsewhere
Event. Coins teach yellow skill that gives 10% bonus to Att/def/mag/mdef for 1 skill point. Crook starts with this skill. Repeating quest will trade all soul shackles for coins and may be required to open 167.
Quest #167 : Seeking the Light
- Difficulty: 45
- Reward: 10 CP, CG #164, Hikari joins.
Crook gone yet again. Head east a few times for a green star event.
Quest #168 : The Desperate
- Difficulty: 45
- Reward: 10 CP, unlocks #169, #186, #187, #188
Contains one of many of a timed subboss fight. Head south twice. Fight random battles or red crystals to get a skeleton key. View Green star event in southwest to teleport to C3. Boss fight with soldier type, 2 radishes and a shield. Soldier has attack and defense buff and regen. This is actually timed but you don't have to win to complete quest. Winnning gets you an item with 200 magic defense and 5 speed and makes it easier on the final quest (See #77).
Quest #169 : Raven Princess
- Difficulty: 46
- Reward: 20 CP, unlocks #170
- Magnum Bonus Guage: Magic Up Set
West twice and North twice. Finding the green star in each room stops encounters. If you just go for the exit you are forced to fight an ambushed battle against Nekomatamata. There is also random party damage as you walk around. In C1 you can fight one of those timed bosses. At the end you fight 4 green stars of Temple Knights - Actually you only need to fight 1 of them. then Rance Jr (He is actually the child of rance and the devil girl you rescue later, first appeared in rance 6) in the middle one. Dark Rance kills a party member every attack and seems to have about 80% resistance to swords. I wouldn't use Rance or Kenshin. Shoulder throw does a ton.
If you go to the middle event at the goal without fighting a single temple guard you will end up fleeing but still complete the quest
Quest #170 : Guiding Leader
- Reward: unlocks #171
Scene only.
Quest #171 : Bishop's Trap
*Difficulty: 46

- Reward: 10 CP, unlock #172, CG #160
- Required: Crook
- Magnum Gauge Bonus: Rare Item List B Uranbator
You are (mostly) not allowed to use spells here (final block). I highly recommend running so you don't run out of healing. Go up stairs and head north, west, (row of red mines is 1 flowery and they all turn to gold) west and over the bridge to the star. Two regular battles then go back over the bridge. Choice is fail quest/leave male character. (Alex, Rocky, Bernard ). Continue west through 3 forced red mines then fight the amazingly looking Goblin. Simple physical attacker as long as you didn't run out of moves.
Quest #172 : Maria's Engagement
- Difficulty: 50
- Reward: 10 CP, unlocks #182, #190, CG #157, 158
- Required: Maria level 35
Quest #173 : Mura? Test 1
- Difficulty: 52
- Reward: 10 CP, unlocks #174
Battle only. Crook can't be used. Right enemy will give you problems if you can't stun it or crit it.
If you can't stunt it crit it just assassinate it.:)
Quest #174 : Mura Test 2
- DIfficulty: 52
- Reward: 10 CP, CG #161, #unlocks #175
- Magnum Guage bonus: Critical Up Set
Crook is unavailable for this quest. Sail east to A2, then head north to enter the waterfall, which will bring you into the AL place at B2. Go south one block, then find a red star for 2 Z Guardian boss. The next area, C3, Physical attack skills are sealed until you beat the miniboss or ignore it and keep going to C4'. Then go south to D4, where there are no encounters and a green star, the entrance to the storage room. Doing it once will be an interrogation scene with a member of AL, doing it again will allow you to go inside the room. However, doing so will 'reduce your party's HP by 1/2, and a Z Guardian will spawn. You can do this as many times you want, but the first three times are plot related (1st time Rance finds the curse-eraser, 2nd time Maria gets back her memories for nuclear reactor, 3rd time the black knight sub boss makes an appearance)
Now you can leave by the green star at the bottom.
- There is a cluster of green star (4?) with monster. Activate all of them and the last one is a Kikikaikai monster (need confirmation.)
Quest #175 : Mura Test 3
- Difficulty: 53
- Reward: 10 CP, CG #162, 163, unlocks #204
Crook is unavailable for this quest. At the start, there is a green star at the bottom which gives you 2 choices (Go after Crook, or return to the castle). Selecting the latter fails the quest. This quest just requires you to walk around and the dungeon will automatically teleport you to the next one. Each time you warp there will be green stars in each dungeon. It is highly recommended that you grab them (don't know if you fail if you don't interact with them). You start out at a forest, then warp to a cave, then underwater, then finally a plain (at basement floor 30). At the Bridge green star, select the second option. If there is only one option get the nearby star. The enemy that drops KaiKai fragments is found here.Just like the Treasure carrier, KaiKai is a random encounter with very low chance - T.H. Afterwards, get the green star across the bridge, then wander around again until you warp to a snowy area. After encountering the event, DO NOT open any of the chests and go head to the next area. Opening any chests here will ultimately fail your quest. In the next area there is a maze, just always turn right. If you go the wrong way, you'll be teleported to the start of the block so it's just trial-and-error through every way till you make it to the boss. Boss is 4 buffer than normal temple knights and a leader. They regen 800 every round and heal all of them for 400 if they don't attack. The leader uses defense up on all of them. Assassinate works on the normal ones, not sure about the boss. They also do not cure poison which negates the regen and actually does 240 more to the boss.
A side note, the knight boss is Sachinko's father.
In my first play through this map, i did all green event, did not open any green chest, and messed up alot in the final block which result in quest fail.
It seems that in this quest, except for the first block, all other block's green event is there to stall your time as the conversations are not related to the quest at all. If you mess up around too much, Crook will die at the end of the quest and thus you fail - opening green chests in snowy area count too. I did all 3 green events at the start, then passed all other green event and opened 2 green chests, yet still able to complete the quest. As the above instruction mentioned, he did all green events along the way, which is 4 so i assume that if you skip all green event, you can open 4 green chests in snowy area and still complete the quest.
Donno if going by the wrong way in the last block count toward this or not though. - T.H.
Quest #176 : Leader Headquarters
- Difficulty: 55
- Reward: 30CP, unlocks #177
South, East, Green Star, Red Star with 5 enemies all taking 2 attacks before you and being invincible to magic, but dying to single Rance Attack (with Chaos), East, traps here, enter waterfall.
Green Star, head west in this room up stairs to a Red Star with another of those timed boss battles you don't need to win. This one has 2 guards along with the boss and they all like to stun. Wind your way around to find a couple more green stars and another Red Star. Hellbell casts spells against everyone, Pararai seems to have high evade and poisons, and Gajiru is the heavy duty fighter with 1240HP regen.
Quest #177 : Tower of Babel
- DIfficulty: 58
- Reward: 30 CP, CG, Pastel joins, #209, #211, additionally if #146 has been cleared already you'll get #115, #147, #199
Final Rance Quest Magnum storyline quest. Unlike #77, this quest is more or less a boss gauntlet, with no random encounters.
Can't say much about the story details here, but you're going up a tower for a total of 70 floors with a fight every 5 floors, every time you proceed you will lose everybody in your current party that are below level 30. You will additionally also lose a random person above level 30. You have unlimited swaps so make sure to exchange your active party for at least two level 30+ characters that you dont need, you will lose one and the other will prevent the quest from failing due to having no one alive in the party, swap back to your combat team after for the upcoming fight
The fights are: (enemies named after appearance, not actual names)
- 3x dark fighter (weak, but will survive getting killed with 1 hp once)
- 1x super/gold hanny 2x green hanny
- 1x agent (weak heal, back row) 1x spider robot (same as the one you had to fight in regular rance quest)
- 4x spike ball 1x spike ball boss (stronger version of spike ball, high evasion)
4x5x demon commander? (the minibosses you encounter throughout rance quest magnum all at the same time) - (I only fought 3, probably the ones I managed to beat). The number you encounter depends on whether you were able to defeat them in the Magnum storyline. If you want to encounter the minimum, one, replay the earlier quests where they show up and beat/kill them there.- 2x brown hanny 1x bucket head (takes very low damage unless stunned)
- Rance Jr (Rance's child, first appears in rance 6)(kills single targets, low hp and pretty weak overall, about 80% resistance to swords)
- giant bouncing orange fanged thing (heals about 3200 hp each turn it gets, bring heavy-hitters)
- sparkler hani, 2x Valkyrie, 2x Iyashinsu
- Battleship (same as malgreed dungeon one, high aoe damage and decent health, bring sturdy heavy-hitters)
- Pastel Kalar (very weak, same as before)
- 1x agent, 2x Daikon (must have near 20k hp)
- 3x Valkyrie, 1x agent, 1x Maid-chan (having Rizna or Nozomi in your battle party might turn one of the Valkyries into a Black/sparkler Hanny)
Your moves get restored for the final boss. Switch to your strongest team after defeating floor 13 as the last transition to floor 14 won't disable anyone in your party and the boss fight starts immediately, the boss has 3 moves:
- a physical damage attack with a chance to stun, damage can range from 700 - 1200 depending on armor, this one is used most often (dark spikes)
- a poison fog attack
- an attack for 1/2 current HP that removes buffs
All attacks hit your entire party so guards are useless while a good healer is a requiremen. You will also need a tactician character that can pep-talk your party as one of her moves debuffs and poisons your entire party (if not resisted).
Damage taken from the main attack can be reduced by having a defense buff and by another 20% through dialogue options, according to the Japanese wiki, if Reset has her skill "ふしぎリセット" (Mysterious Reset).
If you lose to the boss, you can restart the quest and skip to the second to last boss fight on level 65 by picking the top choice ALICE offers you.
>>updated list, not sure if order varies slightly in games but it was missing some entirely<<
Quest #179 : Crystal Rod
- Requires: Shizuka level 40.
- Reward: Crystal Rod
- Quest will FAIL if Shizuka has "Crystal" equipped (The one obtained from choosing to take the crystal in Quest #33)
Scene only.
Quest #180 : Try to Use Beheading Sword
- Reward: 5 CP, Beheading Sword
Kanami needs 300 magic defense to finish event.
Quest #181 : Kugu Torture Machine 4
- Reward: 40 CP; CG #175, 200; Kafe Artful joins
- Requires: Kugu Debris A, B, C
Final Kugu Debris Quest. All found in Malgreed Dungeon 10 (A2, B2, C2).
Quest #182 : Homo Roast
- Difficulty:43
- Reward: 20 CP, CG #155, 173
- Required: Party of 4 included Rance
You cannot change members in this map. Hojo Soun joins party at start. He is level 50 and has the shikigami spells. Which makes this a relatively easy map. Straight north 3 times and no boss.
Quest #183 : Late Night Mill Yorks
- Reward: 5 CP, CG #177
- Requires: Mill Level 35
Scene only.
Quest #185 : Glowing Dick
- Reward: 5 CP
- Requires Kaloria level 35
Kaloria level 35 scene.
CG and dialog is different if you get her "Oppai" skill.
- Since first time will drop her level to 1 anyway, best if you choose the oppai skill the first time, then do this quest, then after reset immediately do it again to get the normal version (2nd time onwards the quest has no level requirement, you can do it whenever you like and scene version will depend on whether she has the skill or not). Afterwards. don't waste skill points on this skill ever again.
Quest #186 : Erotic Hermit
- Difficulty: 43
- Reward: 10 CP
- Requirements: Rance, Rizna, only 4 members Rance's Sex skill may be required. (no stars though)
Need to use Rizna and 2 other girls that like Rance (Lia for example) After 3 battles an exit should appear in the northwest, 3 more battles another exit appears (southeast), 3 more times southwest. Get CG and clear.
Quest #187 : Love Hermit
- Difficulty: 43
- Reward: 10 CP
- Requires: Rance and Shizuka only.
Rance can only attack using Attack 1 and Shizuka can only use Flame Arrow. The fights are easy but you may want to use wait to let them end on their own. I'm not sure it's a maze but I exited southeast twice and there was a green star in the northeast to finish.
Quest #188 : Bishop Day
- Reward: 5 CP, unlock #171
Scene only.
Quest #189 : Kouhime's Dinner Party
- To Unlock: #73 (and possibly #74)
- Rewards: 3 CP, unlocks #155, #183
- Description: Event, Kouhime reverts to lvl 1
SPOILER!!: NO, Rance did not have sex with her. Apparently there's other ways for the Morurun Curse to activate...
Quest #190 : Leader's Magic Sword
- DIfficulty: 50
- Reward: 20 CP, Demon Sword Chaos 148, 157, 191, 192, CG #166
You start out in a forest at the top left block. Keep heading right to A4. Each time you change to a different block you will automatically fall into a trap and lose a party member (it cannot be avoided). Look for a Green "!" which will take you into the hideout. Go into the narrow passage way and fight the red mines along the way, move to the second section and do the same thing. For the third section you do NOT need to go through that passageway, look for two Red "!" marks (The first one you come across is a sub boss timed battle, not necessary to engage). The second red "!" is a CG scene of Feris confined, and leads to a boss battle of Matilda and 2 henchmen. The henchmen can be assassinated, allowing you to focus on Matilda.
Quest #191 : Matilda's Confinement
- To Unlock: Quest #190
- Reward: 10 CP, CG #167
Matilda scene.
Quest #192 : Village Green
- Difficulty: 55
- Reward: 10CP, CG #174, Unlock #193, Caroli Mate ((キャロリ メイト) joins.
- Required: Rance and Crook
You can't use any girls other than Crook in this quest but you can use the guys and bear. There are healing beacons on every screen at least. Head east and north and after an easy boss Rance heroicly cures someone.
Quest #193 : Papacy
- Reward: 5CP, unlock #173
Scene only.
Quest #194 : Pope's Inauguration
- Rewards: 50 CP, CG #176 unlocks #200, 205 - #210 is also unlocked here for me. Need confirmation.
Scene only.
Quest #195 :
For this quest you need the full poster gallery, enemies apparently invade and destroy Sanakia after which you destroy them, and subsequently get destroyed by a boss that shoots 4000 damage laser beams with insane speed ;_;
None of the resistance items help, buffs/debuffs do help but he shrugs off debuffs frequently (the only time I had so much as a fighting chance was when I was able to both buff my defense and debuff his attack several turns in a row) He has a chance to randomly do nothing on his turn, basically this entire fight is a prayer to whatever deity you worship for this to occur at least every other turn. Also note that his laser seems to remove buffs on the party, so a one-shot buff isn't going to cut it, your buffer needs to be able to take at least 2800 damage to keep the fight going (not even sure how much the defense buff really helps, though debuffing his attack helps a LOT -1600 damage orso)
Quest #197 : Am's Test 1
- Reward: 10CP, unlocks #198
Scene only
Quest #198 : Am's Test 2
- Difficulty: 55
- Reward: 30CP
Party members leave after battles here. There are also invincible pigs I think you are supposed to use element punch for. Assassinate works. Go south then west to the end for a rematch. This is one of those battles where it's hard to tell if you are supposed to lose. You aren't. He attacks twice, hits hard 1-1.5k. has very high dodge rate - 140 accuracy will likely miss him for somewhere around 40-50%, very high defense, and counters. In addition to that, he will nullify all damage until Rance hits him with Chaos once.
Rance with Chaos, someone to poison, a good healer and someone for buffs all recommended. Without buffs/debuffs, your characters need about 2k damage to actually make a 4 digits number jump on him with attack 3. He has something like 30k hp so it will be a long battle.
If you're having difficulty with the boss fight destroying your front line too quickly, try placing Kaloria in the front row, with the Blue skill "Hardening." The skill significantly reduces the damage she receives, (at the cost of her being unable to anything else for the rest of the battle) allows her to withstand multiple hits and keeping the boss away from your soft back row. Have your back row medic/s keep Kaloria's HP healthy and revive Rance and whoever else is in your front line. This is one of those rare battles where the"Hardening" skill can be put to good use.
Quest #199 : Dragon Mount
- Difficulty: 62
- Reward: 40 CP, Rank B Rare item you don't have (first time).
- Requires Characters over level 55 (to complete it).

Head East. At the first green star you can pay 30000 for lizard repellant. The other might give you a little money from the vending machine. You need to know what came out of the vending machi'n'e (see picture). Green exclamation warps you to next area. Head east for a red star fight against Green Dragon. So much for lizard repellant (It does stop dragon monsters attacking you randomly throughout though). Probably the same one you fought before with just Rance and Arms
Next area the green stars are mines that will damage you. Walk around to the right and exit west. Anyone under level 40 just disappeared. West again and red star fight against Red Dragon. Has high evade but is otherwise pretty weak.
Next area head North. Everyone under level 45 is now gone. Head East for red star fight against Blue Dragon. This one is a little harder. But try to save your strongest characters (use characters under 50 with ice resist charms if you lack endurance) because the next area:
Cross the bridge and enter the cave, go north-east in both rooms untill you find a red star with the Black dragon; This one has a ton of hit points, deals over 1000 damage with his breath attack and has very high evasion to boot (you're going to need magic or high hit rate) fortunately he seems weak to daggers and doesn't resist or cancel poison. Hit rate about 155 is good enough to hit it. It's not particular weak to daggers. Light magic does a ton. Again, try not to be conservative this battle, it's not over yet...
In the next map (west) you can find a green star, I picked the top option and got sent to the area with the cave entrance and haven't checked the second option yet. Basically it's a sign board. First option is to approach and read it, second is to ignore it.
After all that you reach the summit to find.... quiz guy? He asked you a question which is gibberish to me, I answered with the middle option, which was apparently wrong and lost me the quest (I'm with you there Rance, RAGE!!)
- 1st "Which pink onion". Answers are Pink onion, Green onion, Blue onion.
- 2nd "What drink there was in the vending machine at the base", which is random.
- 3rd is a random question out of 9. Answers are ちくわ; ングィィー婦人; 生娘へのいたずら; 干しプリン; なし; ヌルトンタンH; 高橋; きまきがみ; 冷凍みかん
Quest #200 : Goddess of Truth
- Rewards: 10 CP,
Scene only.
Quest #201 : Angel Hunt
- To Unlock: Complete #191 (or 13 charisma?)
- DIfficulty: 60
- Reward: 30 CP, CG #156
- NOTE: Putting Crook in the party will cause this quest to fail.
This is a straight up battle against 2 Angel Knights. Expect 2k damage from each of them to entire rows, every attack. They may also psyche themselves up. They do have low hp though. Put Suzume in the front and hope she lives long enough for you to kill them. There will be a H CG once you win, and Feris will be given a room within the Rance Castle (simply called フェリスの部屋).
Quest #202 : Lia's Atonement
- To Unlock: #63 (fight knights to save ghost) and #164
- Difficulty: 35
- Rewards: 20 CP, Maris Amaryllis joins
- Requirements: Lia level 35
This quest is a bit tricky. You need to talk to the ghost girl in order to exorcist her. However, you need to lower your HP to certain percentage in order to talk to the girl. Warning will be given when your HP is not at the required percentage (only one character is needed). The requirement is as follows 40% -> 20% -> 10%.
Method to clear:
NOTE: THERE IS NO BOSS IN THIS MAP
Use Okita Nozomi as one of the party members and deploy two defenders with the Initial Protection skill to protect Nozomi. She will automatically reduce her HP each round by 10% (So, if you are lucky, u can finish this within 3 encounters). When talking to the green stars, deploying only Nozomi, and exorcism will be performed. Be sure to disarm the traps first as this map got a lot of traps waiting there for you to step on (which disrupt you to talk with the green stars). Or, you can purposely steps on the traps to initialize battles to reduce the HP.
You need to talk to the green stars in the total of 10 times. 6 times at B3, 4 times at A3.
Quest #203 : Individual Effort
- To Unlock: ??
- Requirements : Party of 1
- Difficulty: 35
- Rewards: 15 CP, ?
- Description:
Fight red stars around the 'zombie map'. Each red star turns into one of: a green one that gives you a new random party member, an exit, money, a healing beacon, a chest,a xp boost or nothing. Mines do the same but I don't think they can be the exit. If you have 5 members you get the choice to replace someone or not. After a few stars one will turn into a portal to another area of the map. This repeats. The enemies start as easy as they come and gradually increase in strength each area.
Quest #204 : Crook's Return
- To Unlock:
- Rewards: 10 CP, unlocks #194
Scene only.
Quest #205 : Pencilcow
- Rewards: 5CP, unlocks #176, 197, Reset joins
Scene only
Quest #206 : Journey of the Twin Flame
- To Unlock: ??
- Requirements : Bernard Seramite and Alexander must be level 25+ and participate, no other characters allowed (Equip one of them w/ a treasure key for the red chests)
- Rewards: 15 CP
- Description:
This quest requires careful preparation beforehand and both characters leveled high enough to succeed. If either is defeated halfway, the quest fails.
It starts with a storyline battle, and afterwards, you are thrown into a jailroom, with both character reduced to 10% of total health and weapon/armor removed. There are no random encounters in this quest, so you may move as much as you want. Trigger the green exclaimation mark blocking the way and choose the first option to fight. There is a single guard that can do around 100 damage per hit. Dispatch it quickly or use healing items to raise your health above the danger zone . Next, go left to the green star on the left, and choose the first option. This will recover about 300 hp for each member.
Next, go to the top right room, first trigger the event at the doorway, and next go to the star without the exclaimation mark to ambush them. And the next battle will have the two enemies on different rows. If you go to the left green star first, both enemies will be on the same row, which is bad if you are low on health. Next, trigger the left green star to get your equipment back. The new star on the right recovers all your skills/items, so use it when you run out.
Next, go to the bottom right star. Here I think you are prompted a password (random each time?). Pick the bottom option, then return to the cell you were originally held in to find a sword and more importantly a green star which contains the password. If correctly chosen, all traps will be removed. Otherwise, MORE traps will be added. Each trap reduces your health by 25% of maximum (there are up to 11 in total), so step on every trap along the way if the p/w is wrong. While you're at it, open both red treasure chests if you're at 1 hp. There's also a storyline green event.
Go to the red thorn and heal yourself, as the enemy has low move priority. next, defeat all three red stars to get the jail key (the green is another heal). Go back to the green event with the pink haired girl, and leave the jail. Outside is a final battle (the boss in the back can stun).
Each time after the initial visit, you can obtain a miko robe at the red thorn.
Quest #207 : Lord's Revolt
- Difficulty: 43
- Rewards: 10 CP, 3 Shackles of soul (魂の枷) (5 required to do #166), 5 Bonus Power Bow, 5 Bonus Coarse Armor
This is a very simple map with a green star event for a Power Attack Bow with 5 bonus and another for a Coarse Armour with 5 bonus. You may want to buy a few armours so it has a higher base. You can reset and get new mods. 全DM20%減 reduces all damage by 20%, 成長率0% means an eventual 200 extra defense/magic defense, 成長率R0% means 600 extra (I think).
Boss is simple soldier battle. They have a cool darkness effect that shows they have the shackles you get for defeating them. They also keep 1hp when you first kill them. These enemies appear in random battles here and also drop shackles.
Quest #208 : Dangerous Fellatio
- Requires: Kibako level 35
Scene only.
Quest #209 : Papal Punishment
- Reward: 5 CP, CG #194
- Required: Crook
Scene only.
Quest #210 : Clergy
- Reward: 5CP, CG #193
- Required: Sel level 35
Sel maintains her virginity like a good Catholic. Scene only.
Quest #211 : Santa Claus
- Reward: 5 CP, CG #191, Attack Up Set, Magic Up Set
- Required: Pastel
Scene only.
Quest #214 : Letter from Japan
- Reward: Chinu from Sengoku Rance join
Find 4 human pieces in green chest in the starting area (2 pieces) and north area(2 pieces). Then go back to the starting block and find the red star at south west. It will be 5 battles against Shirubareru 5 years old, these little "imp" have an AoE debuff with chance to stun your member, instant kill Rance and highly resistance to magic. But they have low HP so don't bother changing your sorcerer. 1st battle have 5 Shirubareru, 2nd have 4 and so on until none are left.
Collect the 5th human pieces behind that red star then run to the east of the block to the green star. After that pick the last choice to revive Chinu(as Zombie).
Note: Quest 16 will pop up again with Kiku joining after this quest. Also, this quest will not appear unless your version of Magnum is 2.05.