
Title Screen
- はじめから = New game
- つづきから = Continue
- アリスの館 = Alice's Mansion
- ゲーム終了 = End game
General Flow of the Game
Every turn in the game consists of your actions, denoted by the number of Action Fans at the top left of the screen (行動回数) followed by the actions of all other nations currently active. To end your turn, you must press the red button (or the ESC key) and select yes (はい).
Before your actual turn begins, you will have several notes scrolling along the bottom of the screen while the player collects money from lands under its control. Units that didn't participate in battle in the previous turn will also recover some of its units.
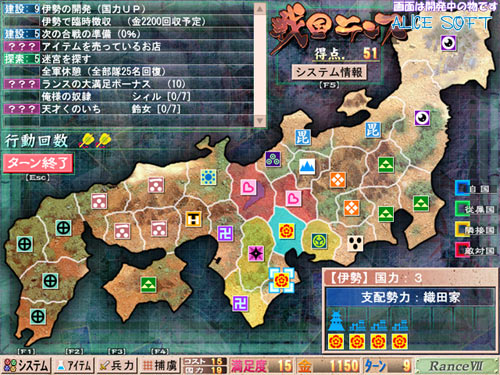
In general, this is how the main screen will look to you.
(c)アリスソフト
Different provinces are colored coded differently depending on their status:
- Blue - Province you control
- Green - Vassaled provinces (not shown in screenshot)
- Yellow - Provinces adjacent to your own
- Red - Provinces currently at war with you

(c)アリスソフト
When the cursor hovers over a province, a list of possible actions for that province will be displayed in the upper left, along with the information of the province at the bottom right.
- The name between 【】 denotes the name of the province.
- Next to the name is the nation power (国力) the province contributes to you (both your own and vassal provinces count).
- The next line, above the territories displays the house controlling the province, similar to the crest shown over the province itself.
- The symbol under the territories display which house have control over them. Completely taking over all territories of a province will transfer control of that province to you and vice-versa. The actual picture shown for the territories displays where you will be fighting, this will effect how much of an advantage the defender has when fighting there, in the picture above, the 3 identical pictures (one of which is blue) are 'fields' where the least advantage is given to the defender and on the far right there are 'castles' where the most advantage is given to the defender, not shown are 'towns' which are in between these two. See Parameters & Formulae and here for more details.
For example, in the screenshot above the Oda House (the player) has control over Ise, while in this shot the Hara House still has three territories under its control. Successfully capturing those three territories will switch control to the Oda House in this example. Do take note at how the line up of the territories also change.
After your turn is done, all other nations currently active will cycle through their actions in random order before the action switches back to you.

(c)アリスソフト. Each turn always begin with the Oda House (player), followed by other houses in random order.
Status Bar and Other Counters
At the bottom of the map is the status bar.
| System [F1] |
Items [F2] |
Troops [F3] |
Captives [F4] |
Cost: ____ | Satisfaction: ____ | Gold: ____ | Turn: ____ | Rance VII |
| Nation power: ____ |
In the System button you can find the following options:
- LOAD (Load a game.)
- 専用HPへ (Opens your browser at AliceSoft Rance 7's page.)
- CGモード (Opens up the CG collection.)
- 音楽モード (Opens up the Music collection.)
- 環境設定 (Set message options.)
- タイトル画面へ (Go to the Title screen.)
- ゲーム終了 (Close the game.)
- SAVE (Saves the game.)
The next three buttons are the Items, Troops and Captives. The two cells on the right are Cost (コスト) at the top and National Power (国力). To the right is the Satisfaction (満足度) of Rance, followed by the Gold (金) you have and the current turn (ターン).
In the Items screen you can see all the Items under your possession, for use or for equipping.
(c)アリスソフト
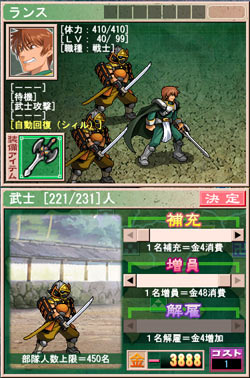
In the Troops screen you can find all your Captains and other troops, along with their skills and main stats. Though in this screen you can only see the left side of the status of a commander, at the top is the life (体力) for when exploring dungeons, followed by the LV and occupation of the unit. Along the left side are the skills: offensive, defensive and passive. The green bar displays the number of soldiers in the unit, current and max and the red button is similar to an "accept" used when working with the sliders at the bottom. The top one (補充) will refill your units. Directly below is the cost rate, in this case for each unit you need 4 gold. The middle one (増員) will increase the max number of soldiers in the unit at the price shown below per unit. There are limits to the max which increase with the flow of the game or other events. The last one (解雇) will fire troops, in this case giving you the money shown below per unit you fire. At the bottom is the total cost in gold (金) for the changes to the sliders and the cost in national power (コスト) to the right. Do note you can change the sorting by using the top buttons.
- 必要數值順: Will sort the commanders by parameters. For example, if you are doing a search and press this button, your commanders will be ordered from top to bottom by who has the highest search points.
- 並び替え: Modify the line up by hand.
- 解雇: Select a commander to remove him/her from your lineup.
In the Captives screen you can see all the units in your prison. By selection one and pressing the button whereas the three sliders would be, you can use units to convice the captive into joining your army. Simply select units until the number of your negotiation points goes over what the captive requires.
The Cost is the added sum of the cost of all your units compared to your National Power. If the former exceeds the latter, you will be receiving only half of your normal income until you can regulate the cost. Satisfaction is used for Rance to obtain certain bonuses, among others. Your current gold is just that, the gold you have on hand, and the turn is at what turn you currently are.
If you noticed in any of the previous screenshots a counter at the top of the map, near the System (システム) button, those are the current points you have. Each turn the counter decreases by one and certain actions increase them. They are used for 2nd and further games to obtain bonuses.
Also, in the System screen you can see your current objective (in Japanese obviously) and the current seals that have been broken. After five have been broken something might just happen...
Actions
What you can do in a turn is generally limited to the number of Action Fans you have (found directly below the action list you can see below, right by the word "行動回数") and, of course, what you can do with them. Here's a picture showcasing some simple commands:

(c)アリスソフト
Generally, commands can be broken down into 5 types, all explained below.
- Blue Commands (建設): Construction or Expansion
- Yellow Commands (交渉): Negotiations of any kind
- Red Commands (合戦): Battles and Dungeons
- Green Commands (探索): Exploration
- Purple Commands (???): Events
- Blank Commands (No tag): All sorts of miscellaneous stuff.
For Blue, Yellow, and Green commands, you must gather up a certain amount of points from your units. Each character has three different stats for this: one for construction, one for negotiation, and the one for scouting/searching. Purple, Red, and Misc. events can be done instantly, provided you have an Action Fan.
'Blue Commands' have two uses for the most part:
- <Province> の開発 (国力UP): Increases the National Power of the province by 1. The maximum National Power any one province can have is 30. The formula for knowing a provinces' current National Power is:
[(Construction Points needed to add 1 NP to province) / 3]
- 次の合戦の準備 (#%): Gives you an advantage shown by the percentage during the next battle fought in that province.
'Yellow Commands' can vary a bit, but overall you'll see only three options:
- <House> に宜戦布告: Declares war on the selected House.
- (Missing name): Forces the opposing House to surrender, making it your vassal.
- 人材発掘: Unit name (Class): Recruits a unit of the specified class.
'Red Commands' are generally brought down to four types, though two are basically the same.
- <House> と合戦 (攻め込む): Attacks a territory of a province under control of a particular house. Example: The Demon Army is: 魔軍と合戦 (攻め込む).
- <House> と合戦 (奪い返し): It's the same as fighting, except the territory is in a province you control.
- Dungeons: The name of each dungeon is at the beginning and only the end changes a bit, but they are easy to recognize.
Additionally, there are also some fixed battles in some provinces that will always spawn the same enemies for you to fight in commander battles:
- Botan Hunt: Available in Sado (requires Uesugi Kenshin and Naoe Ai) and Owari (requires Kouhime) any one of these events is redoable the turn after they are first done and then once every 4 turns afterwards (although you will never lose a chance to redo the event, if you wait 9 turns after your third attempt of the event in Owari, you will still be able to do the event). The event in Owari gives a base reward of 500 gold, increasing by 50 every time the event is done. The event in Sado gives a base reward of 700 gold, increasing by 100 every time the event is done (the increase from Owari/Sado will also increase the reward from Sado/Owari, so if you've done Sado's event twice and Owari's once, your second completion of Owari's event will give you 500+100+100+50=750 gold). Doing this event enough times rewards you with the Golden Seal (60 'Boar Points' are needed, Owari's event gives 10 per success and Sado's gives 20), one of the Six Great Treasures. The Botans will start at level 10 and their level will increase by 1 every time Owari's event is done an by 2 every time Sado's is done, it is unknown if there is an upper limit to their levels, or the gold rewarded for victory.
- Challenge Golden Bear: Available in Edo and only doable once, the player must fight 6 Golden Bears (4 level 40s, 1 level 50 and 1 level 60), upon victory the player will be rewarded with the equipable Power Golden Bear, which will increase the Atk of a unit by 2 points.
- Headfish Hunt: Available in random provinces at seemingly random times, always re-doable, the player must fight 3 level 20 Headfish. Doing this event rewards you with 5,000 gold.
- Monkey Hunt: Available in Saitama (requires Kentou Kanami) and Himeji (requires character-cleared Yuzuhara Yuzumi), both one-time events with 3 level 30 Monkeys. Doing it in the first province gives Kanami 5 levels and gives you 5,000 gold, and doing it in the second province rewards you with the Kanzou Mask.
- Panda Hunt: Available in Kazusa 2000 (requires Hakkin Dasan) and Mid Earth (requires said province to be under your control), they are both redoable but there's no solid information on when, the one in Kazusa 2000 seems to be redoable 4 turns after first being done and then every 8 turns after the second time it has been done but the one in Mid Earth seems random. The player must fight 3 Pandas (level 30, 350HP). Doing it in Kazusa 2000 gives Hakkin Dasan's unit 500 pandas, and doing it in Mid Earth gives Mid Earth 2 more National Power. NOTE: this event will still be available even if Mid Earth has 30 National Power.
- Search for and Defeat Ogres: Available in Death Country (requires Sill), can be done twice, the first time will have you fight 6 level 25 Blue Ogres, the second time replaces the front row with level 30 Red Ogres. Each completion gives all commanders a level.
- Seiitai Shogun: Available in Saitama and only doable once, the player must fight 3 Red Ogres (level 30), 2 Botans (level 10) and the level 80 Shougun who has a hit-all attack that requires preparation and requires 3 shrunkens to cancel. Victory gives you the Seal of Approval item and the ability to declare war on the Dokuganryuu house,
'Green Commands' have three types:
- 迷宮を探す: Used to discover a dungeon in that province.
- 秘宝 Item Name: Used to search for a particular item or person.
- Covert Action: These can range from preventing the targeted house from attacking on their next turn and causing a revoult, reducing the house's number of troops to assassinating random enemy commanders (not key NPCs).
'Purple Commands' are all "???" and are usually for scenes (similar to Blank Commands) or other random stuff (such as Rance Satisfaction bonuses, etc.). Some might be H-scenes, some might not. Under most circumstances, any of the options to speak with a person in your roster is usually under a blank command, but if an event can happen, a "???" tag will show up next to it.
Battle System
There are two types of battles: frequent troop battles and infrequent dungeon battles.
Troop Battles
(c)アリスソフト
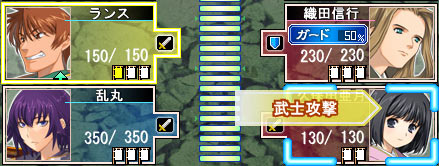
What matters in these battles are the units' troop sizes, which in a sense act as the HP of their commanders. Once a unit's troop size hits 0, it is considered annihilated and taken out of combat.
Directly below the unit's size is the number of actions it can take, represented by small war banners. White banners show unused action points, red banners show points already spent, and yellow banners show how many points the current action will take (see screen below).
Above the unit windows is the turn order (not shown). This displays when units' turns appear, determined by each unit's Speed stat, the presence of speed buffs, the class of the unit and what move the unit last used (although no exact formula is known). When you hover over an action for your unit, a green arrow may appear between unit names; this determines when the current unit's next turn will appear. If there is no green arrow, then that unit's next turn will appear at least two turns later than the last unit in the turn order. NOTE: If a unit has no white banners left when their next turn comes up (possible when an opposing unit has removed their last one), they will simply be passed over and removed from the turn order.
Along the center of the screen is the battle clock, displayed as a number of bars. Each bar will disappear when a unit takes action, and when all of them disappear, the battle will end; the winner is then determined as the side the indicator on the bar at the top of the screen is not on. As long as the indicator is to the right of the bar's middle, you'll win the battle even if enemy units are still alive. Alternatively, defeating every opposing unit will make you the victor.
There are different types of troops, each with their own skillsets that they can use during battle. The general type of a unit can be found by looking at the small tab on the unit's window. Some units, such as Warrior, Foot Soldiers, and Musketeers, can attack only while they are in the front column of battle, while ranged units can act from both columns.
There are several up arrows under the portraits of the units; they are status boosts granted either by skills they own or from bringing Tactician units into the battle.
- Red: Attack Boost
- Blue: Defense Boost
- Magenta: Intelligence Boost
- Green: Speed Boost
As a general note, Foot Soldiers (the shield-type) have the ability to Guard other units. Whenever a unit in that column (some translations say row, but relative to what appears on screen, it's the column) or in the whole group if the Foot Soldier has the 'All Guard' skill is the target of an attack, the percentage shown above the Foot Soldier's troop size is the chance that his/her unit will take the hit instead. In addition, the Foot Soldier takes half damage from all physical attacks (i.e. all attacks that do damage based on a units Atk stat) other that Guard Break while Guarding (although, possibly due to a glitch, if a Foot Soldier's guard chance is reduced to 0 as described below, and not by the use of the move Guard Cancel the Foot Soldier will still take half damage from all physical attacks).
If a Foot Soldier is hit by an attack, there Guard chance reduces by 40% (if a Foot Soldier is protected by Guard Shikigami, there Guard chance does not reduce).
The only way to bypass a Foot Soldier with 100% or greater Guard chance is to use a move that hits more than one unit (e.g. Volley) or to target that Foot Soldier with an attack that hits only one unit, while another Foot Soldier is positioned such that they will Guard that Foot Soldier (Foot Soldiers can Guard each other but will not Guard themselves).
(c)アリスソフト
To attack, simply hover your mouse over an enemy portrait and click on a displayed option. Hovering the cursor over one of the options will display on your acting unit the number of Action Points it will use (symbolized by yellow banners).
The same applies for defensive and support actions; just hold the cursor over an ally portrait instead.
When the battle is decided (either by the turn bar being completely drained or one side being completely wiped out), a box may overlap a unit's window.. NOTE: It seems up to 2 max labels (no matter which) can appear per side (not including units that always die when annihilated or the effect of Light Attack).
- A blue "Captured" label (only seen on enemy units) means that you've seized the unit's commander and tossed them into your Prison, where you can later decide to recruit or release them.
- A red "Killed" label means that the unit's commander has been removed from the current game. If it's on one of your enemy's annihilated units, he/she will never be encountered in another battle for the rest of the playthrough. If it's on one of your annihilated units, the commander (and the unit under him/her) gets removed from your general roster; any item that commander was equipping at the time gets put back into your inventory. If Rance's unit is annihilated, then he will be Killed at the end of battle and you get a GAME OVER.
Dungeon Battles
In dungeon battles, your commanders fight alone much like a dungeon RPG. Each person fights alone in the order given at the top of the screen. Most commanders have two attacks: the first uses one action fan and does decent damage, while the second uses all remaining action fans and does something special (usually extra 1.5 times extra damage). To attack, hover over the enemy you want to attack and click on the action you want to use. Dungeons have multiple floors, each holding monsters that must be defeated. To clear a dungeon, you have to defeat every monster on every single floor. This is made easier by the fact that you can switch out characters when needed. To do this, hover your cursor over the character who you want to switch out and choose Switch, although any given unit cannot switch themself out. Unfortunately, the characters that you switch in are decided at random; the only exception is Sill, who will always be the first to switch in for the the back row.
Miscellaneous notes on Dungeon battles:
1) Sill's S-Healing, when used on Rance, can also give him an action so that he can act again. Combine with Rance's S Rance Attack for best effect. A similar technique can be used with the move Convert Action, which all Monks have in Dungeons.
2) The first time a dungeon is cleared, every commander in the roster gains one Level, which increases their health, attack power, and general survivability in Dungeons.
3) Dungeons also can open up new screens and new CGs, usually between Rance and Sill, making them a good source of SAT.
4) A number of items can only be obtained from dungeons, making it good practice to visit them often.
See also
For a more mathematical perspective on the game, which will help to explain issues such as why certain units who seem to have good stats often perform worse than their stats suggest, see Parameters & Formulae.